So far every guest in this series has been plugged into vmbr0, and I told
you to keep the default. In this part we look at what that means, how
to split guests into separate networks, and how to find out what a guest
is actually doing on the network.
How Proxmox networking works
Linux bridges (vmbr0)
A bridge is a switch made of software. Your guests’ virtual network cards plug into it, and so does a physical network port on the server. The installer sets up exactly one: it “creates a single bridge named vmbr0, which is connected to the first Ethernet card” [1]. The server’s own IP address sits on that bridge as well.
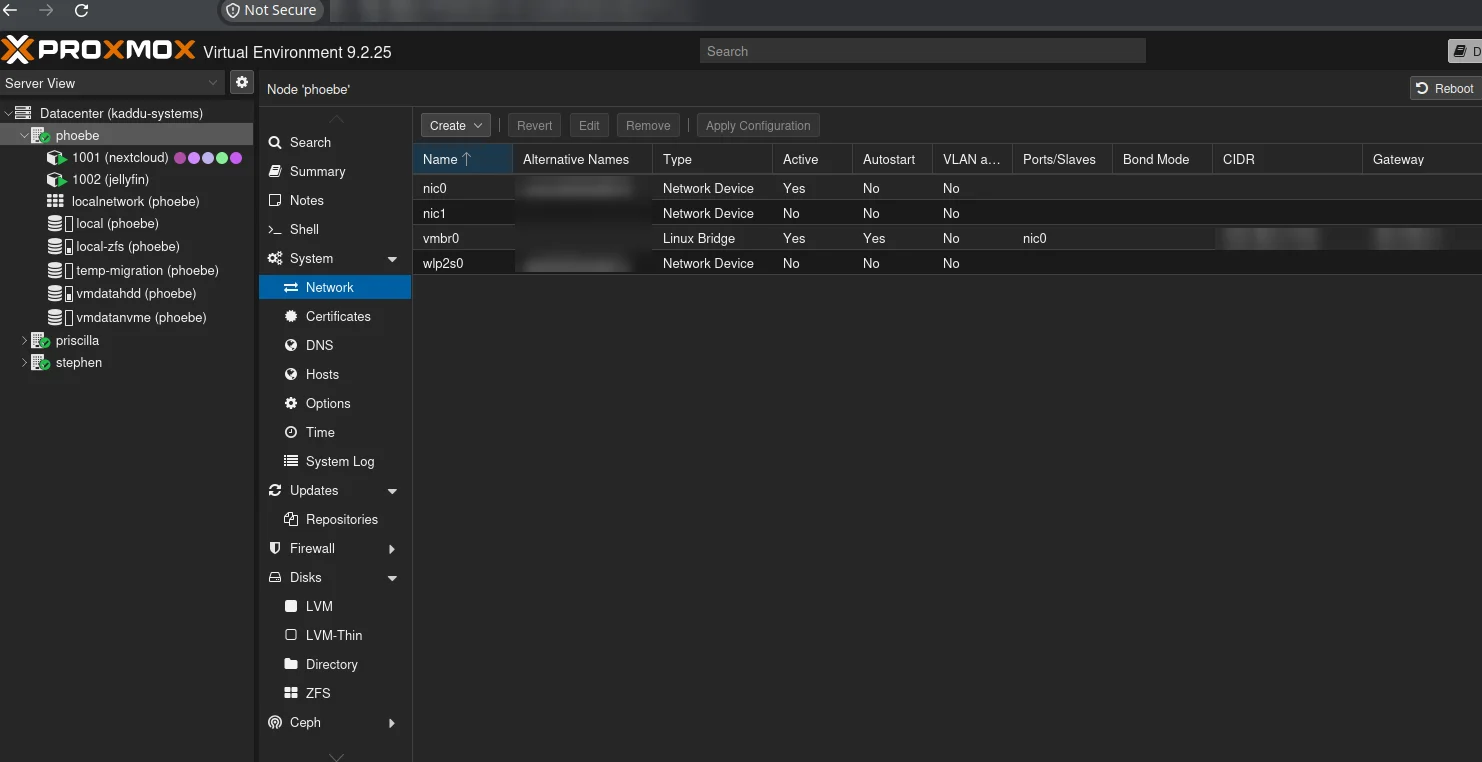
You can see it under your node, in System > Network. In the file it
lives in, /etc/network/interfaces, it looks something like this:
auto vmbr0
iface vmbr0 inet static
        address 192.168.1.10/24
        gateway 192.168.1.1
        bridge-ports nic0
        bridge-stp off
        bridge-fd 0
bridge-ports is the physical port. A bridge with no port at all is
allowed too, and then it is a private network for the guests on that server.
Two things are useful to know before changing anything. Changes in the web
interface are first written to /etc/network/interfaces.new, and only take
effect when you press Apply Configuration. If you edit the file by
hand, ifreload -a applies it [1]. And if you change the bridge
that carries the server’s own address, a mistake takes away your way in, so
have a monitor and keyboard nearby the first time.
On my phoebe, running 9.2, the Ethernet port is called nic0, not one of
the older names like eno1 or enp1s0, so don’t be surprised if yours
looks like that. The Alternative Names column in System > Network
shows the name it would otherwise have had: enx followed by the card’s
MAC address. The installer did this: since 9.1 it offers to pin each network card to a
fixed nic name [5], so the name stays the same when a kernel update or a new card
would otherwise change it, and it keeps one small file per card, matched by
MAC address, in /usr/local/lib/systemd/network/.
One oddity on phoebe: the installer pinned the Wi-Fi card as well, as
nic1, but the card still comes up as wlp2s0. So System > Network
lists a nic1 that is never active. It does no harm, and if you see one
like it, check the MAC address in those files before you go looking for a
missing network card.
Bonds
A bond ties two or more network ports into one, for more bandwidth, for redundancy, or for both. Proxmox offers seven modes. The advice is short: if your switch supports LACP, use 802.3ad, and “Otherwise you should generally use the active-backup mode” [1].
Two warnings if you are heading for a cluster. Don’t use balance-tlb or
balance-alb on a bridge with guests on it [1]. And the cluster
network doesn’t need a bond: “Corosync does not need a bond for network
redundancy as it can switch between networks by itself”, and some bond modes
“are known to be problematic for Corosync” [1].
My Tinys have one Ethernet port each, so I have no bond to show you, and I
would guess the same goes for most small homelabs. phoebe also has a Wi-Fi
card (wlp2s0), but it stays unused: a Wi-Fi card is no good as a bridge
port, because the access point only accepts frames from the one device that
logged on to it, not from the guests behind it [4].
VLANs in Proxmox
A VLAN splits one physical network into several separate ones. Frames carry a number, the VLAN tag, and a switch that understands tags keeps the numbers apart. So one cable from the server to the switch can carry the guest network, the IoT network and the server network together.
VLAN-aware bridges
There are two ways to do this in Proxmox. The traditional way has one VLAN
device and one bridge per VLAN: vmbr5 for VLAN 5, and so on. The simpler
way is one bridge that understands tags, and it is the one I would use:
auto vmbr0
iface vmbr0 inet static
        address 192.168.1.10/24
        gateway 192.168.1.1
        bridge-ports nic0
        bridge-stp off
        bridge-fd 0
        bridge-vlan-aware yes
        bridge-vids 2-4094
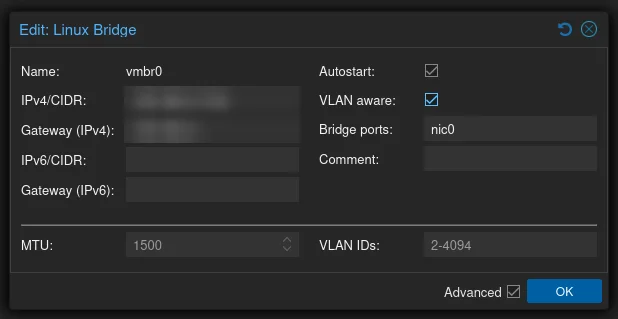
In the web interface it is one tick: edit vmbr0 in System > Network and
tick VLAN aware. The last line, bridge-vids, lists the tags the bridge
accepts [1]. In the dialog it is the VLAN IDs field, which
only shows when you tick Advanced at the bottom, and it already says
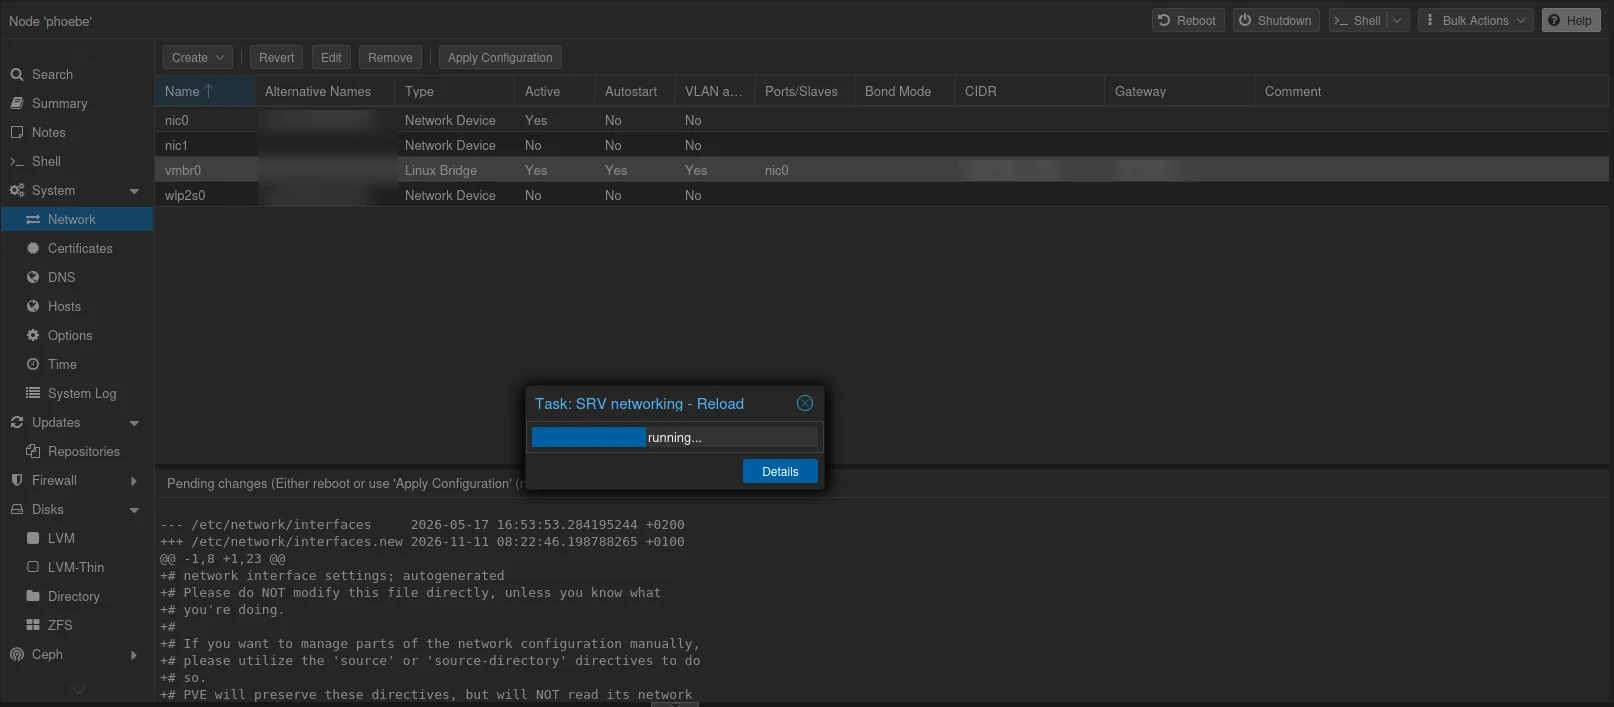
2-4094. Press OK, and the change waits in a list of pending changes at
the bottom of the page until you press Apply Configuration.
The switch port the server is plugged into has to carry those tags as well. On a UniFi switch that means a port profile that allows them. If the switch drops the tags, guests on a VLAN simply get no network, and it looks like a Proxmox problem when it isn’t.
The server’s own address can also move to a VLAN, on its own interface,
vmbr0.5 for VLAN 5 [1]. That is one for later, when you have
console access and some time.
Tagging a VM or container network interface
With a VLAN-aware bridge, the rest happens on each guest. In the guest’s Hardware (VM) or Network (container), edit the network device and put the number in VLAN Tag. That’s the same field you left at “no VLAN” in part 2 and part 3.
The guest needs no VLAN setup of its own. The bridge adds and removes the tag, and the guest sees an ordinary network. It takes an address in that VLAN’s range, so something on that VLAN, usually your router, has to hand one out.
On my own network the VLANs live on the physical side, not in Proxmox. The UniFi controller has six: Default (1), dirtynetwork (20), kaddulan (50), kadduiot (100), kaddumgmt (150) and kadduguest (200). Three Wi-Fi networks sit on top of them: the main one, one for IoT devices on 2.4 GHz only, and one for guests. The EdgeRouter X is the gateway for five of them. dirtynetwork is the odd one out, and it only exists in the UniFi switches. It carries the raw internet connection from the fibre box in our bedroom, through the switches, to the router’s internet port, so the router can sit somewhere else in the house. The switch port the router’s internet port plugs into sends it out untagged, so the router never sees a VLAN at all, just an internet connection.
Proxmox doesn’t use any of the VLANs yet. The servers and every
guest are on one untagged network. While writing this, I ticked VLAN
aware on phoebe’s vmbr0. That changes nothing for the guests on
their own: traffic without a tag carries on as before. No guest has a tag
yet, so the rest of this section is how I would do it, not how it runs
here today.
Software-Defined Networking (SDN)
SDN is the newer way to define networks, for the whole cluster in one place instead of server by server. It has been “installed by default” since Proxmox VE 8.1 [2]. You find it under Datacenter > SDN.
It has three levels. A zone is the kind of separation. A VNet is a virtual network inside a zone, and appears as a bridge on every node. A subnet is an address range in a VNet [2]. There are five kinds of zone:
- Simple: an isolated bridge on each node, usable with NAT.
- VLAN: ordinary VLAN tags on an existing bridge, so guests on different nodes can reach each other.
- QinQ: stacked VLAN tags. Your switches have to support it.
- VXLAN: a network tunnelled over UDP, across networks. It isn’t encrypted.
- EVPN: routed overlay networks using BGP, also across clusters.
Changes are recorded as pending, and you apply them together from the SDN panel [2]. 9.2 adds fabrics and WireGuard on top [2], for those who need them.
Do you need it? On one server, no. A VLAN-aware bridge is less to understand. Once you have a cluster, a VLAN zone gives you a named network, the same on every node, and that starts to be useful: a guest that migrates finds the same network on the other side. Note that IPAM, the part that manages addresses and DHCP for guests, is still a technology preview [2].
Whether SDN is worth it on my own three-node cluster, I don’t know yet. I need to dig into it properly before I decide, and that dig will get a post of its own.
The Proxmox firewall
Proxmox has a firewall built in, at three levels: datacenter, node and guest. “The firewall is completely disabled by default” [3]. So all those ticks in the Firewall box you saw on the network card do nothing yet.
There is also a newer version, built on nftables. It is still a technology preview and not meant for production [3], so the rest of this assumes the standard one.
Turning it on without locking yourself out
Enabling it at datacenter level blocks traffic to your hosts, apart from management access, so this is where people lock themselves out. In this order:
- Open an SSH session to the server and leave it open, as the documentation advises [3]. If you get it wrong, you still have a way in.
- Check that the computer you work from is on the local network, or put its
address in the
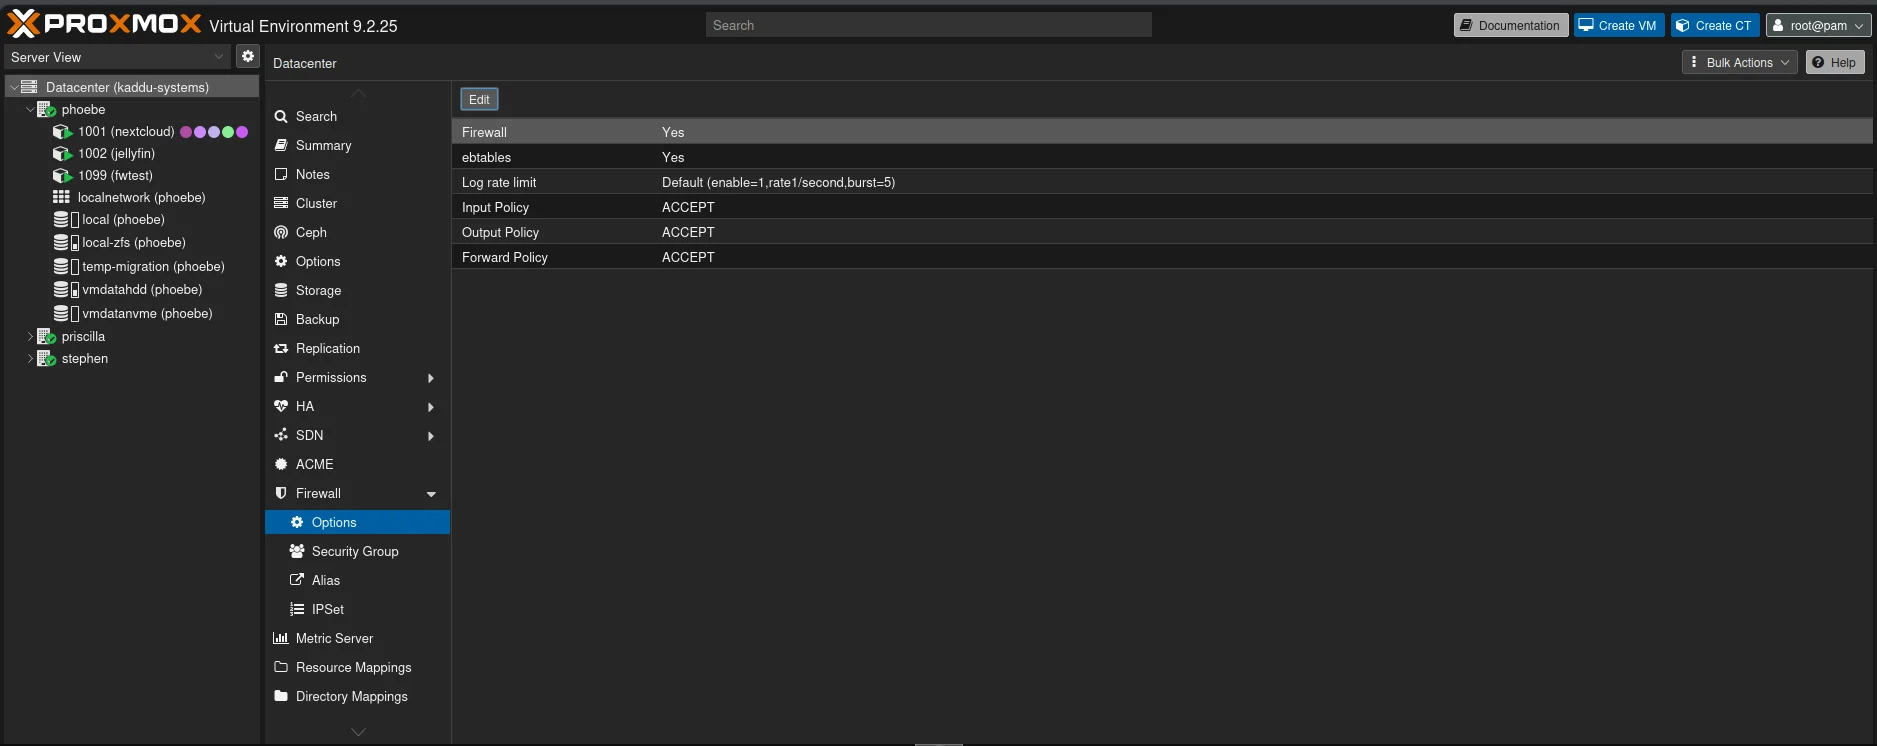
managementIP set under Datacenter > Firewall > IPSet. That set gets access to the web interface on port 8006, and to SSH [3]. - If all you want for now is a firewall on one or two guests, set Input Policy to ACCEPT under Datacenter > Firewall > Options first. Then the hosts let everything in, as they did before, and only the guests you switch on get rules.
- Datacenter > Firewall > Options: set Firewall to Yes.
 5. Reload the web interface in a new tab, and log in over SSH in a second
window, before you close the first.
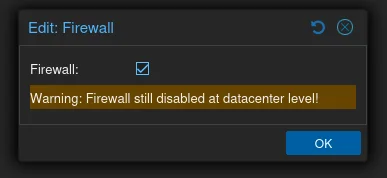
If you switch on a guest’s firewall while the datacenter one is still off, Proxmox tells you: the dialog says “Firewall still disabled at datacenter level!”, and the guest’s rules do nothing until you have done the steps above.
Rules for one guest: only the home network
Here is a worked example: a guest that may talk to the home network but not to the internet. It is useful for anything you don’t quite trust. Try it on a throwaway guest first, not on one you depend on. I made a small container for it, CT 1099, from the same Debian 13 template as in part 3, and deleted it again afterwards.
A guest has its own on/off setting: it needs Firewall > Options > Firewall = Yes on the guest, “in addition to the general firewall enable option” [3], and the Firewall tick on the network card.
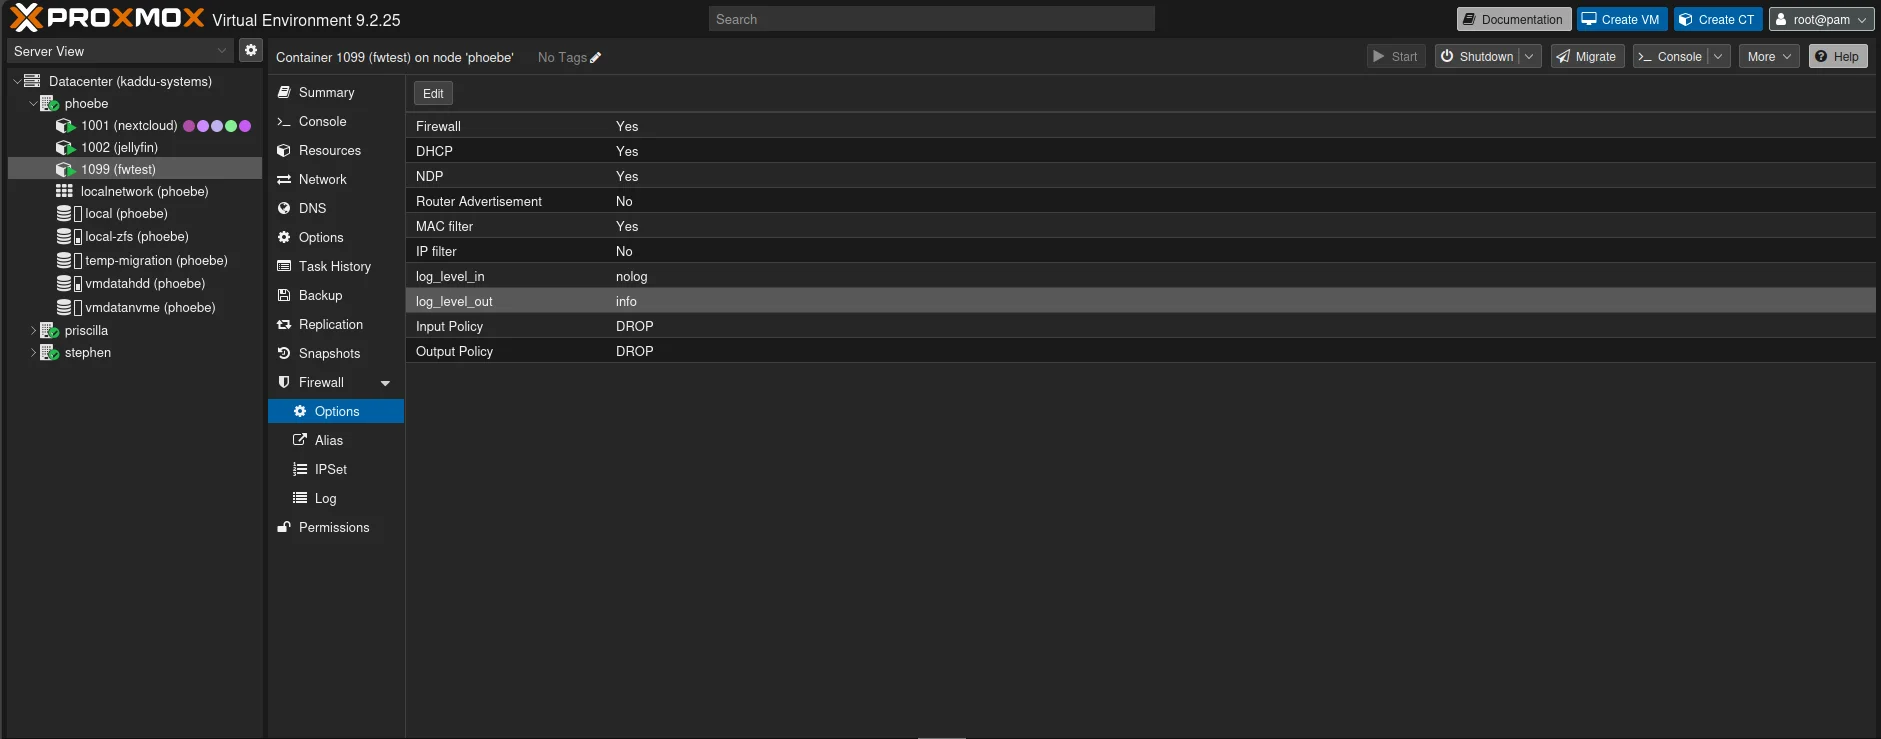
- Under the guest’s Firewall > Options, set Firewall to Yes and Output Policy to DROP. Everything out is now blocked unless a rule says otherwise. The guest still gets its address: the DHCP option there is Yes by default, so DHCP gets through.
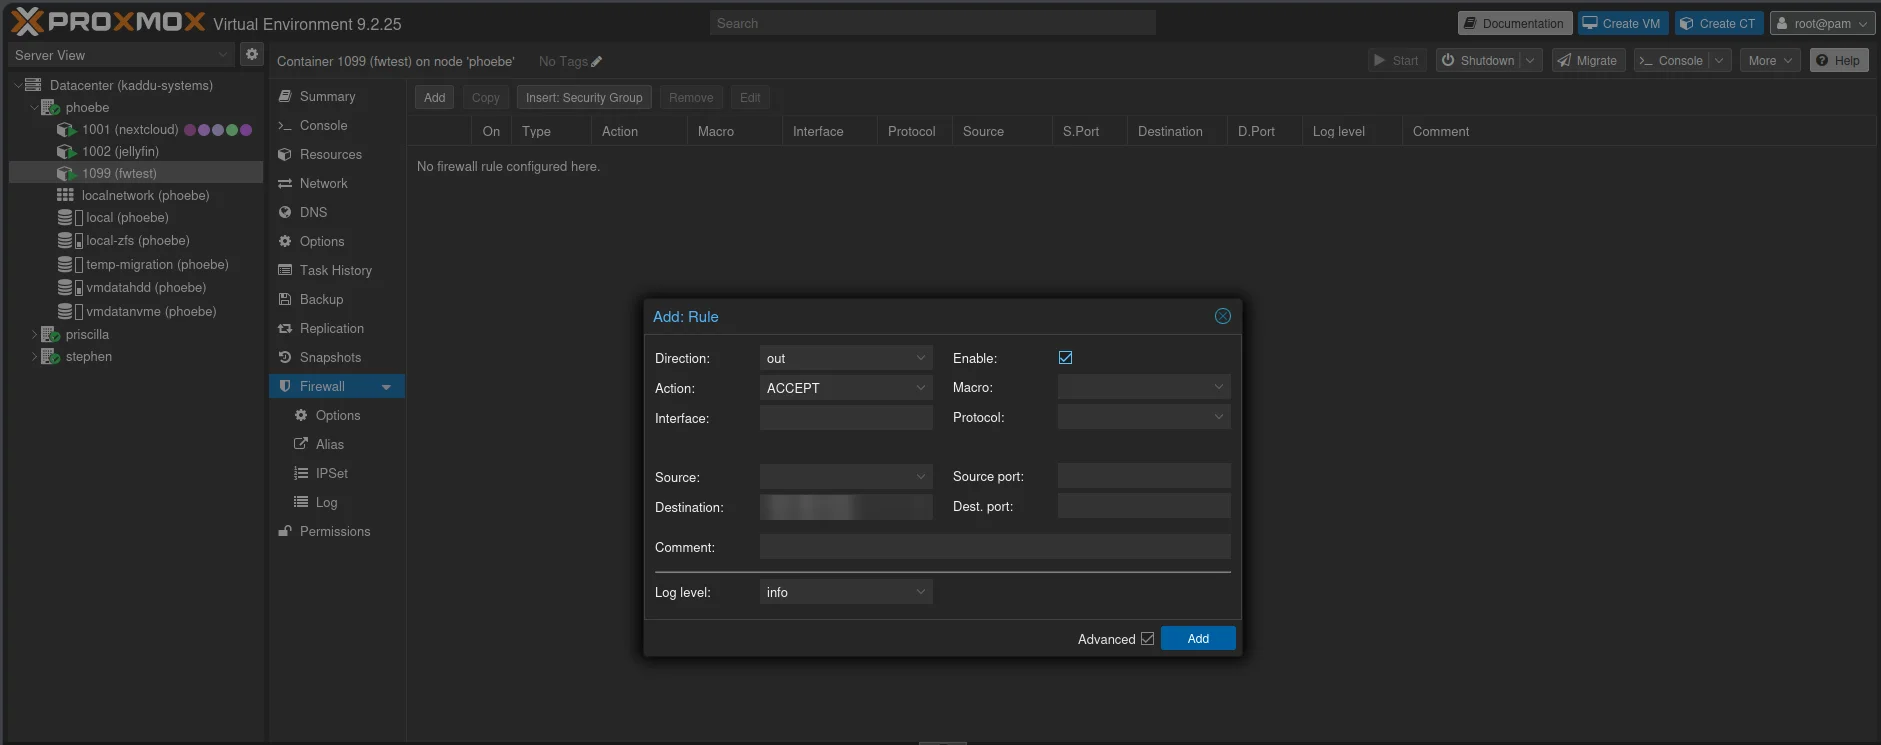
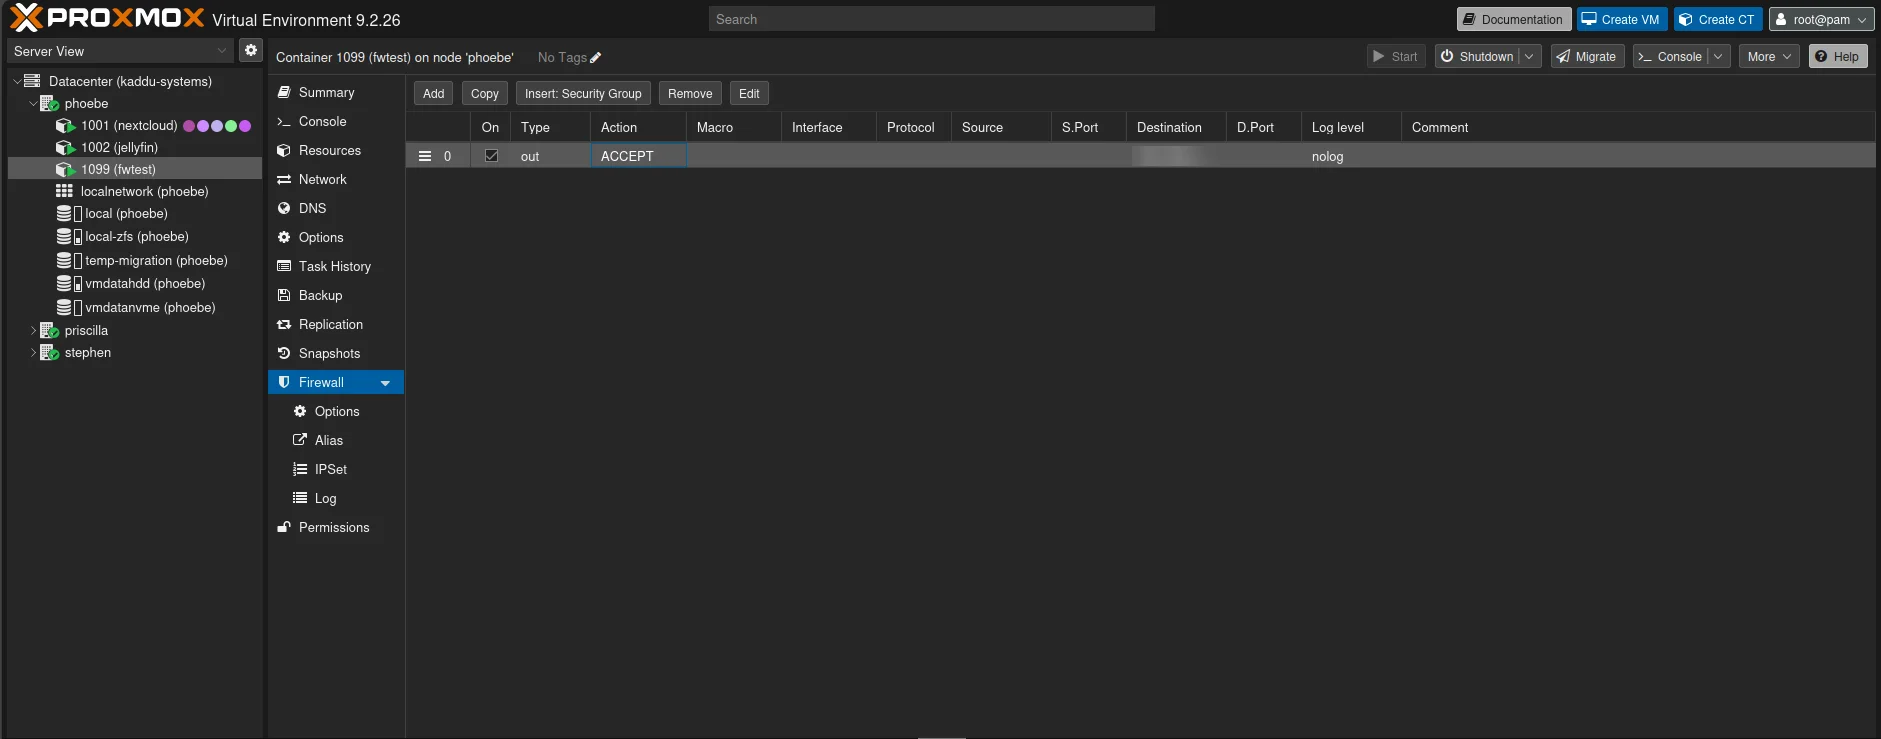
- Under Firewall, add one rule: direction out, action ACCEPT,
destination
192.168.1.0/24. An alias under Datacenter > Firewall > Alias gives that range a name, and then a change only has to be made in one place [3].
- Start the guest and try it. A
pingto your router should work, and apingto anything on the internet shouldn’t.
From the host, with pct exec, it looks like this on my test container
(shortened, and with the example range instead of my own):
# pct exec 1099 -- ping -c 3 192.168.1.1
3 packets transmitted, 3 received, 0% packet loss

# pct exec 1099 -- ping -c 3 1.1.1.1
3 packets transmitted, 0 received, 100% packet loss

# pct exec 1099 -- apt update
Err:1 http://deb.debian.org/debian trixie InRelease
  Could not connect to debian.map.fastlydns.net:80 (199.232.42.132), connection timed out
  Cannot initiate the connection to deb.debian.org:80 (2a04:4e42:47::644). - connect (101: Network is unreachable)
Two different errors there. “Connection timed out” is the firewall: the packets are dropped without a word, so the guest waits until it gives up. “Network is unreachable” isn’t the firewall at all. The container has only a local IPv6 address and no IPv6 route to the internet, so it gives up at once. And note that apt found the addresses: the names were looked up through the router, which the rule allows.
If pct exec fills the screen with perl warnings about locales, that is
your own session’s language settings being passed into a container that
doesn’t have them. Harmless; put LC_ALL=C in front of the command to
quiet them.
DNS needs a thought. If your router answers DNS, the rule above already covers it, and the guest can look up names but not reach them. That turns out to be useful, as you will see below.
Logging what gets blocked
Logging is off by default as well: “all logging of traffic filtered by the
firewall rules is disabled” [3]. Under the guest’s Firewall >
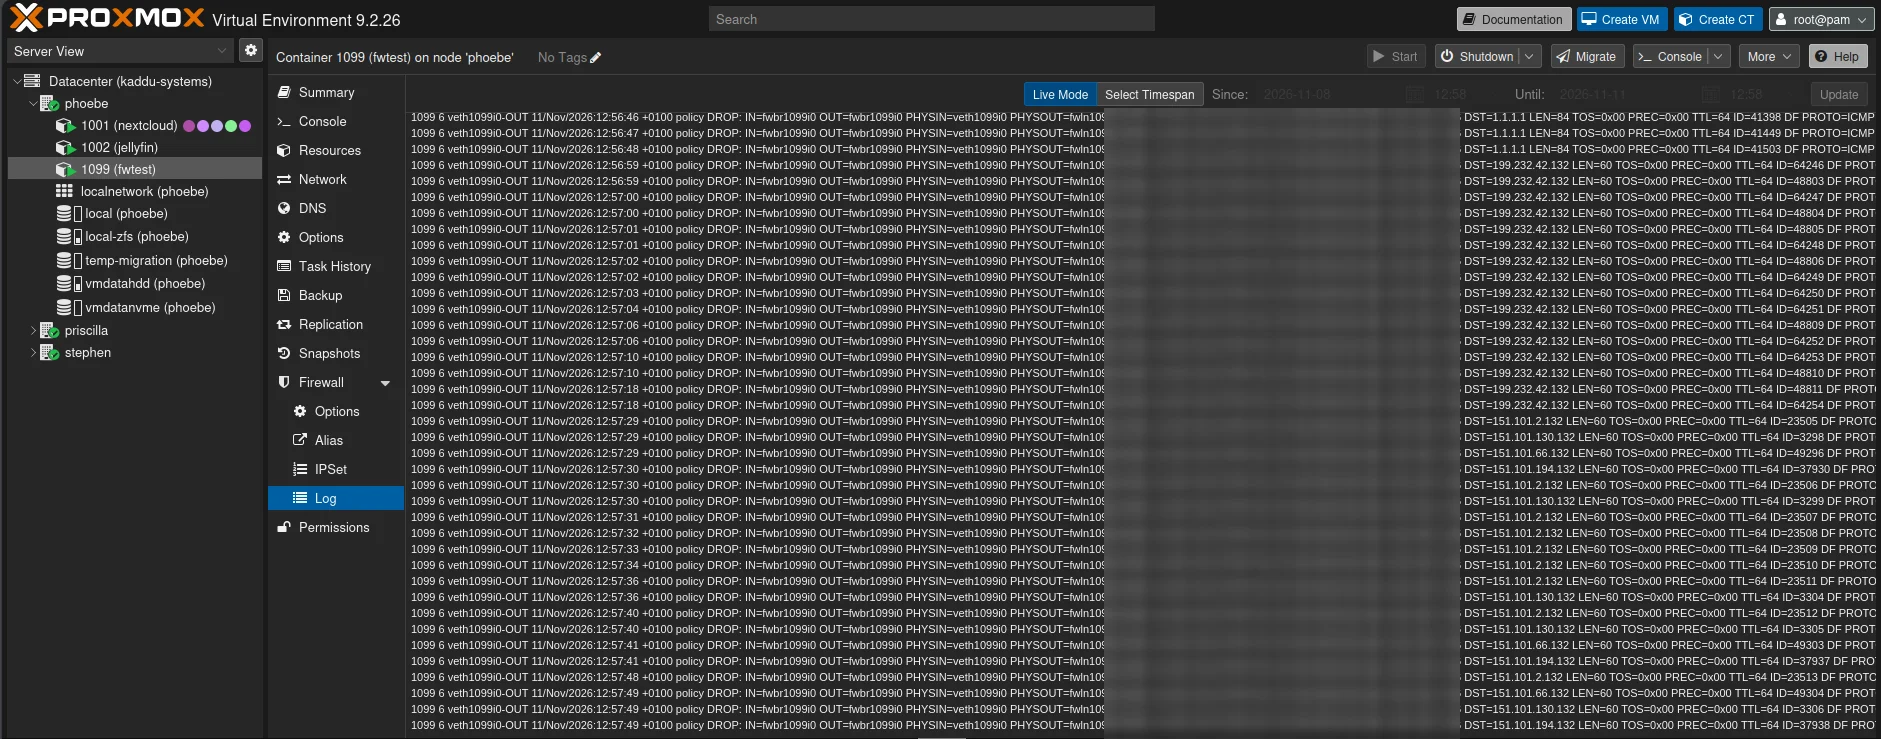
Options, set log level out to info. Then Firewall > Log shows every
blocked attempt, with the address and port it wanted to reach. Leave the
rule’s own Log level at nolog. That one logs what the rule lets
through, and with a rule for the whole home network, that is nearly
everything.
That list is often the most interesting part of the exercise. Leave a new guest running overnight with a DROP policy, and in the morning you have a list of everything it tried to contact.
Watching what a guest sends
The firewall tells you what was blocked. To see what a guest actually sends, you can listen in from the host, without touching the guest.
Every guest’s network card is a device on the host. A container’s is called
veth<VMID>i<n>, so net0 of CT 1099 is veth1099i0. A VM’s is
tap<VMID>i<n>, so net0 of a VM 100 would be tap100i0. Check with
ip -br link. With the firewall turned on for a guest, a few more show up
next to it. On phoebe, container 1001 has veth1001i0, plus fwbr1001i0,
fwpr1001p0 and fwln1001i0: a small extra bridge with a cable pair to
vmbr0, which is where the firewall rules for that network card are applied.
For listening, the veth or tap device is still the one to use.
apt install tcpdump tshark

# live: which names does it look up?
tcpdump -i veth1099i0 -n port 53

# everything, for later
tcpdump -i veth1099i0 -w guest.pcap

# afterwards: names looked up, most frequent first
tshark -r guest.pcap -Y dns.qry.name -T fields -e dns.qry.name | sort | uniq -c | sort -rn

# which servers it opened TLS connections to
tshark -r guest.pcap -Y tls.handshake.extensions_server_name \
  -T fields -e tls.handshake.extensions_server_name | sort | uniq -c

# who it talked to, and how many bytes each way
tshark -r guest.pcap -q -z conv,ip
What this can’t show is the contents of encrypted traffic. You get the names, the servers, the timing and the amounts. That is usually enough to answer the question you started with: what does this thing want on the internet? I will use exactly this, with the firewall rules above, in a later post about a cloud-tied NAS system.
Example: putting guests on separate VLANs
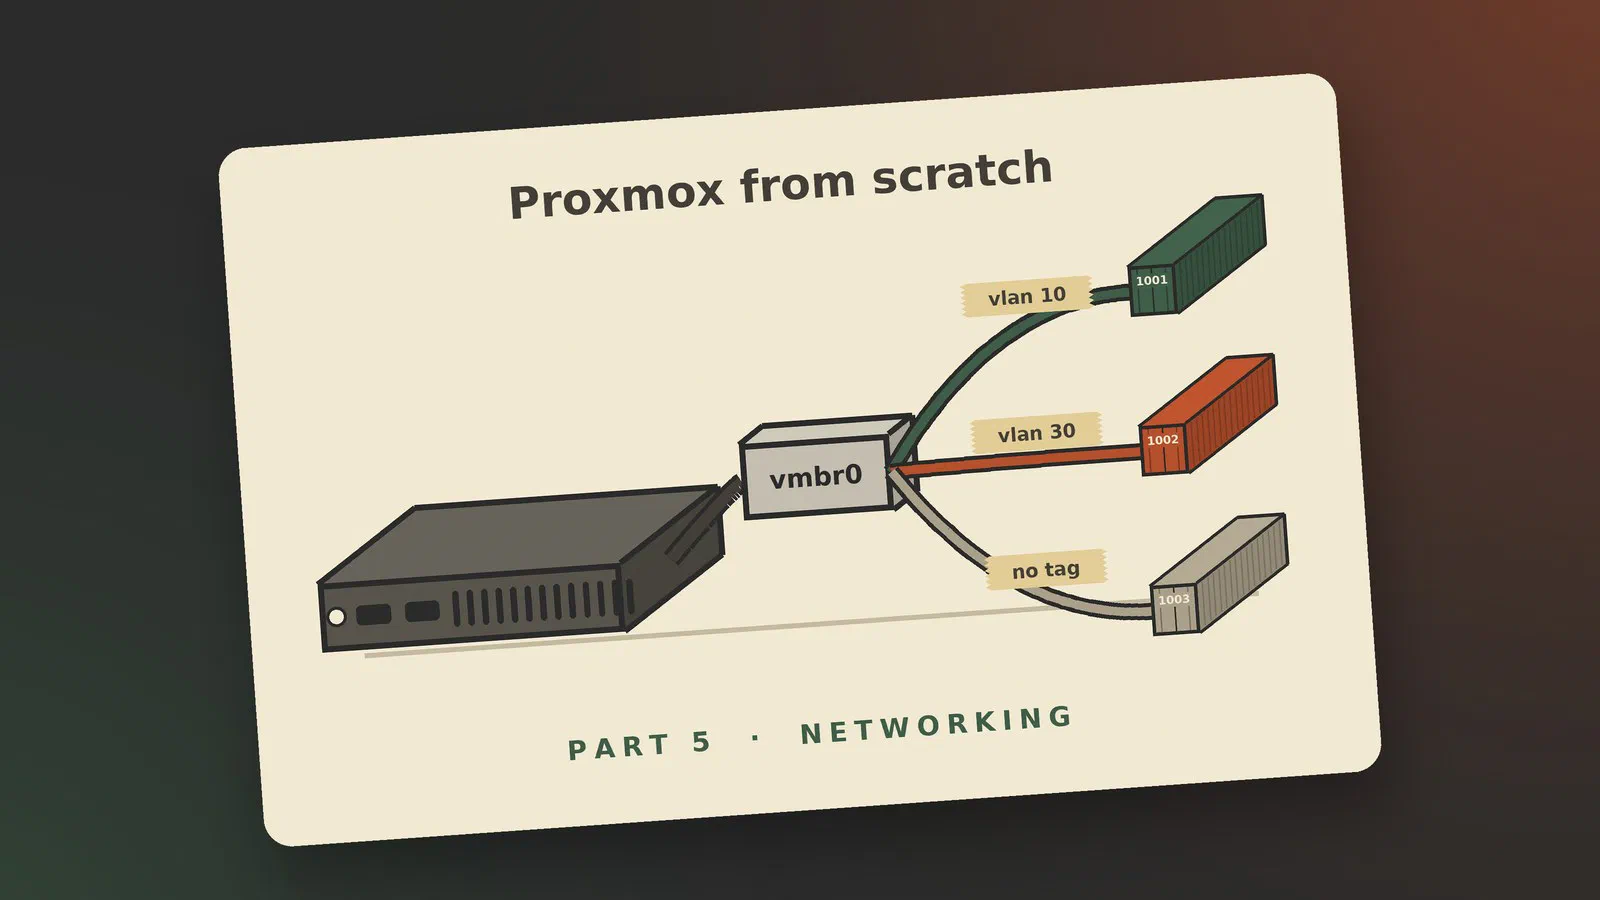
To put it together, say you want Nextcloud on the server network and an untrusted test VM on a network of its own, on the same server.
- On the router and the switch, create VLAN 10 (
10.10.10.0/24, servers) and VLAN 30 (10.10.30.0/24, test), with DHCP on each. Let the switch port to the server carry both. - On the server, tick VLAN aware on
vmbr0, and press Apply Configuration. - Set VLAN Tag to 10 on the Nextcloud container, and to 30 on the test VM.
- Restart the guests’ networking, or the guests, and check that they have an address in the right range.
- Add rules on the router so that VLAN 30 can’t start connections to VLAN 10.
Step 5 is what most guides leave out. VLANs separate the networks, but your router connects them again by default, because that is what routers do. Separation only happens when you say so on the router.
For the planning behind this on my own network, I will come back in December with a post on VLANs and one on the upgrade.
What’s next
The guests now have disks and a network, and both can fail. In the next part we make sure that isn’t the end of them: backups of virtual machines and containers.
Sources
- Network Configuration (Proxmox VE), pulled 2026-11-02
- Software-Defined Network (Proxmox VE Administration Guide), pulled 2026-11-02 (first 100,000 characters of the page)
- Firewall (Proxmox VE), pulled 2026-10-26, rechecked 2026-11-02
- WLAN (Proxmox VE wiki), pulled 2026-11-11
- The Proxmox 9 feature that finally fixes NIC renaming problems (Virtualization Howto), pulled 2026-11-11