This is the first part of Jellyfin at home. By the end of it Jellyfin 12 is running on my Proxmox server, it answers in a browser, and the first library is in. The parts after this one are about naming the files so Jellyfin recognises them, hardware transcoding, apps and remote access, and backups and upgrades.
This is my own Jellyfin server being built, not a demo. I write down what I did, including what I would do differently.
Why Jellyfin, and why in a container
Jellyfin is a media server: it reads your folders of music, films and shows, fetches covers and descriptions, and plays them in a browser, on a phone or on a TV. It is free and open source. There is no account to create with anyone, and nothing in it is held back for paying customers, which is the usual reason people choose it over Plex.
The current version is 12.4, from 26 October 2026 [13]. It is the fourth bugfix release since 12.0 came out in September. I wrote about what changed in 12 in What’s new in Jellyfin 12.
LXC, VM or Docker?
On Proxmox there are three places Jellyfin can live:
- A virtual machine. The strongest isolation, and the heaviest. For hardware transcoding the graphics chip has to be passed through to the VM, which takes it away from the host.
- An LXC container. Light, and it can share the host’s graphics chip without taking it over, which matters in part 3.
- Docker. Jellyfin publishes an official image, and the documentation has a ready Docker Compose file [1].
I use the last two together: an unprivileged LXC container with Docker
inside it, and Jellyfin started from a docker-compose.yaml. It is the
same layout I use for Nextcloud, one service per container and one
compose file per container, and I explained it in part 3 of Proxmox
from scratch.
It is one layer more than strictly needed, and Proxmox says so itself:
for “maximum isolation and the ability to live-migrate, nesting
containers inside a Proxmox QEMU VM remains a recommended practice”
[5]. I accept that for three reasons. Every service on my
server is set up the same way. The version is pinned in one file, so an
upgrade is a decision and not something that happens during apt upgrade. And the things Jellyfin writes can each sit on their own
volume, which is what most of this post is about.
Community scripts vs. doing it by hand
The Proxmox VE Helper-Scripts have a one-line installer that creates a Jellyfin container for you [11]. It is a fine shortcut. I build mine by hand here, because I want to know what is in the container when something stops working.
What we are building
- One unprivileged LXC container with Debian 13, Docker and one compose file. Nothing else lives on its own disk.
- Three extra volumes for what Jellyfin writes: its database and settings, its artwork, and its cache.
- Three volumes for the media: music, video and books. Jellyfin only gets to read these.
- All six are volumes that Proxmox creates and manages, so they belong to the container and move with it. From the container they are handed on to Jellyfin’s Docker container.
The container
The container is the one I created in part 3 of Proxmox from scratch, container 1002 on my server phoebe. Why each number is what it is, is explained there:
| My container | |
|---|---|
| Cores | 4 |
| Memory | 4 GB |
| Swap | none |
| Disk | 32 GB |
In short: what uses the processor is transcoding, and until the graphics chip takes over in part 3, the processor does all of it [3]. Jellyfin’s advice is 8 GB of memory for an average server, but “for a Linux server running without a GUI, 4GB may be enough” [3]. No swap, so I see it plainly if 4 GB is too little. The disk only holds Debian, Docker and the Jellyfin image, because the database, the artwork, the cache and the media all get volumes of their own.
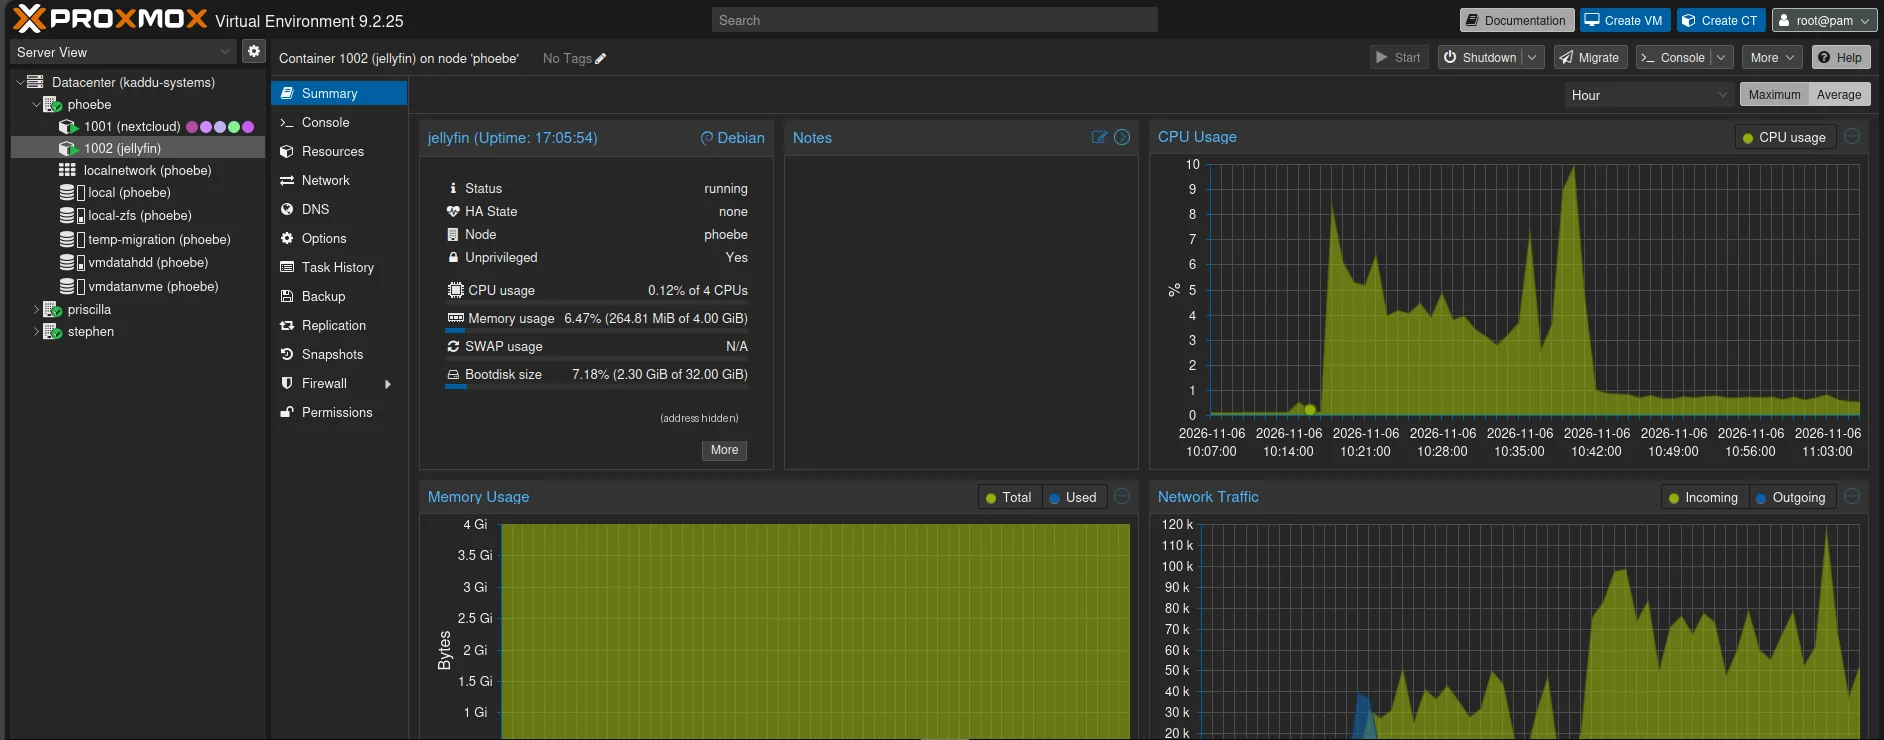
In practice it needs far less memory than that. With the music library
scanned, free -h in the container showed about 400 MiB in use and
3.6 GiB still available. Proxmox’s Summary page counts a little
differently and showed 265 MiB:
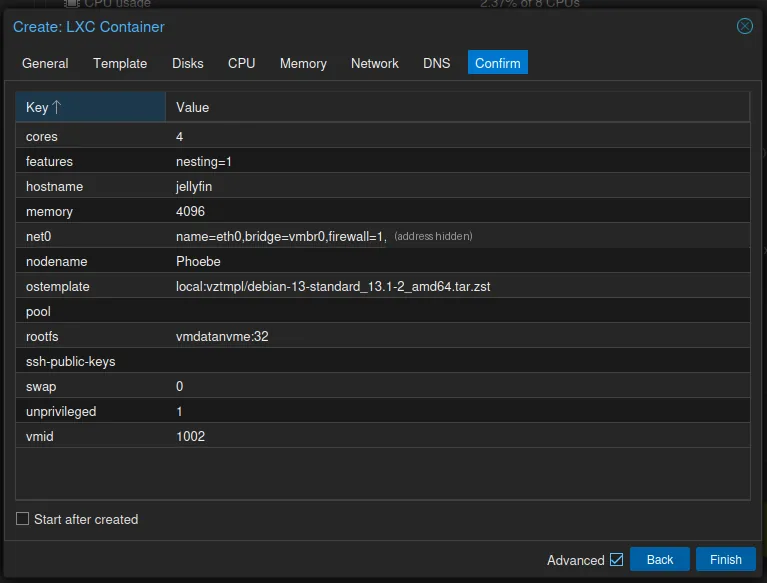
This is everything I chose in the Create CT dialog, on one page:
The same on the command line, with your own address in place of the
example. pveam available shows the current name of the template; mine
was debian-13-standard_13.1-2_amd64.tar.zst:
pveam update
pveam available --section system | grep debian-13
pveam download local debian-13-standard_13.1-2_amd64.tar.zst

pct create 1002 local:vztmpl/debian-13-standard_13.1-2_amd64.tar.zst \
  --hostname jellyfin \
  --unprivileged 1 \
  --features nesting=1,keyctl=1 \
  --cores 4 --memory 4096 --swap 0 \
  --rootfs vmdatanvme:32 \
  --net0 name=eth0,bridge=vmbr0,ip=192.168.1.50/24,gw=192.168.1.1 \
  --onboot 1
I gave it a fixed address. The apps remember the server’s address, so it should not change. A DHCP reservation in the router does the same job.
Two of those lines are there for Docker:
unprivileged 1means root inside the container is an ordinary, powerless user on the host [5]. It is the default, and I keep it.features nesting=1,keyctl=1: Docker needs both. Nesting was ticked in the dialog.keyctlis not, and goes on under the container’s Options, Features. The documentation says of it: “This is required to use docker inside a container” [6].
The last line, onboot 1, is Start at boot under Options: the
container starts when the server does.
My container already existed, so I set both on it from the host, with the container stopped:
pct set 1002 --features nesting=1,keyctl=1 --onboot 1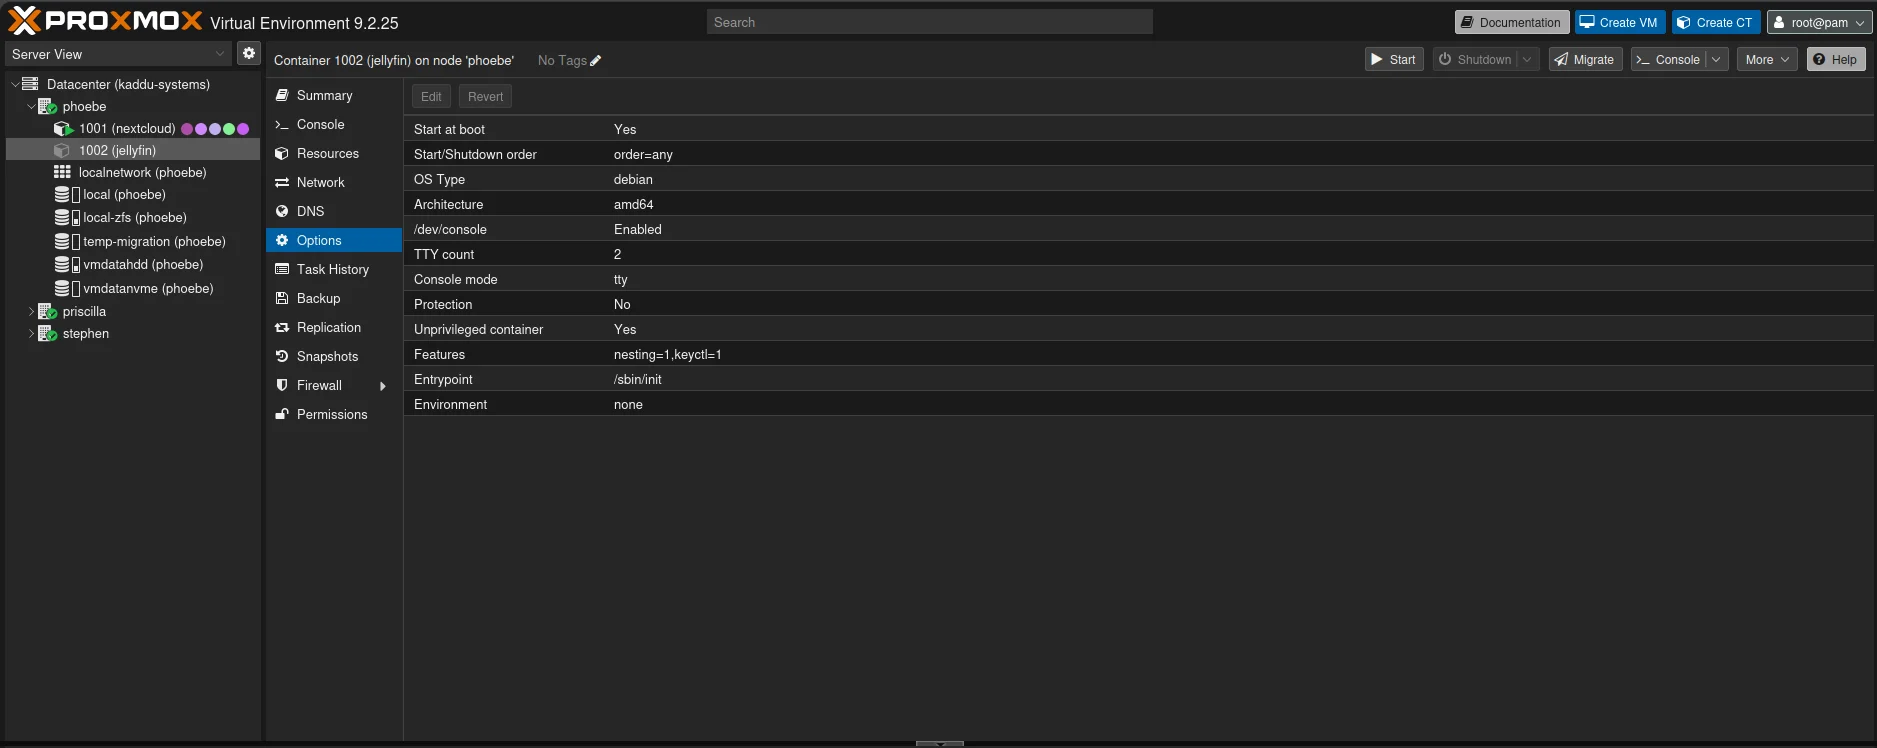
Volumes: config, metadata, cache and media
This is the part to get right before Jellyfin starts for the first time, because some of the settings only apply to data written after they were set.
Jellyfin’s storage documentation has three rules that shape the layout [2]:
- The database is SQLite, and on ZFS it wants a small record size: 4K or 8K, where the default is 128K.
- Media files want the opposite, a large record size. 1M is “likely appropriate”.
- The database must be on local storage, not a network share, and nothing but the media belongs on spinning disks.
In the official image, Jellyfin’s data directory is /config and its
cache directory is /cache [9].
Volumes, not folders from the host
A container can get extra storage in two ways. A bind mount hands it a folder that already exists on the host. A volume mount point is a new volume that Proxmox creates on one of its storages and manages from then on, just like the container’s own disk [15]. I went through both in part 3. Here I use volumes, for one reason above the others: in part 8 of Proxmox from scratch this container moves to another server.
A container that is moved takes its volumes with it: Proxmox copies them to the storage of the same name on the other server [15]. Proxmox can also keep a copy there all the time (replication), so that a move only has to send what changed since the last copy [17]. A bind mount gets none of that. Proxmox does not manage it, and it does not copy it.
The price is that a volume belongs to one container. If I later want a second service to read the same books, the books have to be shared some other way.
The six volumes
My servers have two storages for guests, sorted by the kind of drive, as
I described in Storage in
Proxmox. vmdatanvme is the
fast tier, on the NVMe drive. vmdatahdd is the slow tier, on a 1 TB
hard disk that phoebe got last week. Jellyfin’s rule above decides which
volume goes where: what Jellyfin writes goes on the NVMe, and the media
goes on the hard disk.
| Mount point | Storage | Inside the container | Seen by Jellyfin as | Size | Settings | In Proxmox backups |
|---|---|---|---|---|---|---|
| mp0 | vmdatanvme | /srv/jellyfin/config | /config | 8 GB | recordsize=8K | yes |
| mp1 | vmdatanvme | /srv/jellyfin/metadata | /config/metadata | 16 GB | default record size | yes |
| mp2 | vmdatanvme | /srv/jellyfin/cache | /cache | 60 GB | no backup, no replication | no |
| mp3 | vmdatahdd | /srv/media/music | /media/music | 100 GB | recordsize=1M, read-only | no |
| mp4 | vmdatahdd | /srv/media/video | /media/video | 250 GB | recordsize=1M, read-only | no |
| mp5 | vmdatahdd | /srv/media/books | /media/books | 10 GB | recordsize=32K, read-only | no |
Some of these choices are mine and not the documentation’s:
- Artwork apart from the database. The posters and backdrops are
ordinary image files and gain nothing from an 8K record size. Giving
them their own volume, mounted inside
/config, leaves the small record size to the database. - Films and shows in one volume. A file can then be moved from one folder to the other without being copied.
- The sizes are ceilings. On ZFS a volume’s size is a limit on that one dataset, not space set aside. Jellyfin can fill its own volumes and nothing else on the disks, which it shares with my Nextcloud. The music is about 46 GB today and the films and shows about 93 GB, so there is room to grow. For the cache, the documentation’s example is a 50 GB Blu-ray film that can take from 15 to 60 GB once transcoded [2]. A volume can be made bigger later with Resize.
- The same storage names on both servers. priscilla has
vmdatanvmeandvmdatahddtoo, on its own NVMe and hard disk. When the container moves there, each volume lands on the same tier it left. Nothing inside the container changes. atime=offon all of them, so reading a file does not cause a write.
Three kinds of copy, three switches
My server has three ways of copying a guest’s data, and each volume needs the right answer for each of them.
ZFS snapshots, pulled to my backup server. Everything under my guest storage is snapshotted every 15 minutes, and my backup server pulls the snapshots every hour. I described that in 3-2-1 in practice. It works on the datasets underneath Proxmox, with everything below them, so a new volume is backed up from the first hour without my doing anything. That is what I want for the database, the artwork and the media.
Proxmox’s own backups (vzdump) copy the container’s own disk, but
“by default additional mount points besides the Root Disk mount point
are not included in backups” [16]. A volume is included
only if it says backup=1 [6]. In the web interface that
is the Backup box, which is ticked for a new mount point, so a volume
made there is in the backups and one made with pct set is not. I
learned that from my own configuration: my first two volumes came out
without it. Proxmox backups “are always full backups”
[16], so including the media would copy the whole library
again on every run, and the media is already backed up by the ZFS pull.
Config and artwork go in with backup=1: a Proxmox backup of this
container is then a working Jellyfin with its settings, its users and
its database, waiting for its media.
Replication keeps a copy on another server in the cluster, which is
what makes moving the container fast. My servers are becoming a cluster
this month, in part 7 of Proxmox from scratch, and replication itself
is part 8. Every volume takes part unless it says replicate=0
[6].
The cache is the odd one out. Transcode files are large, worthless a
minute later, and would be kept in snapshots and sent across the house.
So the cache stays out of all three copies. For Proxmox that is no
backup=1 and a replicate=0. sanoid and syncoid don’t know about
Proxmox’s flags, so the ZFS side is done by hand: a dataset with the
property syncoid:sync=false “will not be synchronised to any hosts -
it will be skipped” [18], so the cache never reaches my
backup server. What sanoid does with it locally is further down.
If you set up your own snapshots, the rule is the same: give each volume the backup it should have, not the one its neighbours have.
A note on deduplication
Both of my pools have ZFS deduplication switched on, and every new
dataset inherits it. I switch it off for all of Jellyfin’s volumes. Music and
video are already compressed and every file is different, so there is
nothing to find, and each block would still get an entry in the
deduplication table. If your pool does not use deduplication, leave
dedup=off out of the commands below.
Creating them
In the web interface: click the container, then Resources, Add, Mount Point. Choose the storage from the table, the size and the path inside the container. Under Advanced are Read-only, Backup and Skip replication. Do it with the container stopped.
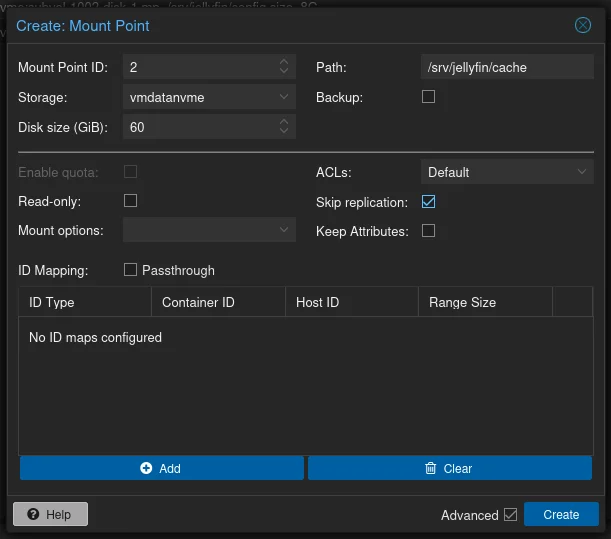
Or on the Proxmox host, as root. vmdatanvme:8 means “a new volume of
8 GB on the storage vmdatanvme” [15]:
pct set 1002 -mp0 vmdatanvme:8,mp=/srv/jellyfin/config,backup=1
pct set 1002 -mp1 vmdatanvme:16,mp=/srv/jellyfin/metadata,backup=1
pct set 1002 -mp2 vmdatanvme:60,mp=/srv/jellyfin/cache,replicate=0
pct set 1002 -mp3 vmdatahdd:100,mp=/srv/media/music,ro=1
pct set 1002 -mp4 vmdatahdd:250,mp=/srv/media/video,ro=1
pct set 1002 -mp5 vmdatahdd:10,mp=/srv/media/books,ro=1
Leaving backup out is the same as backup=0, so the cache and the
media need nothing for it. In the web interface, untick Backup for
those four instead.
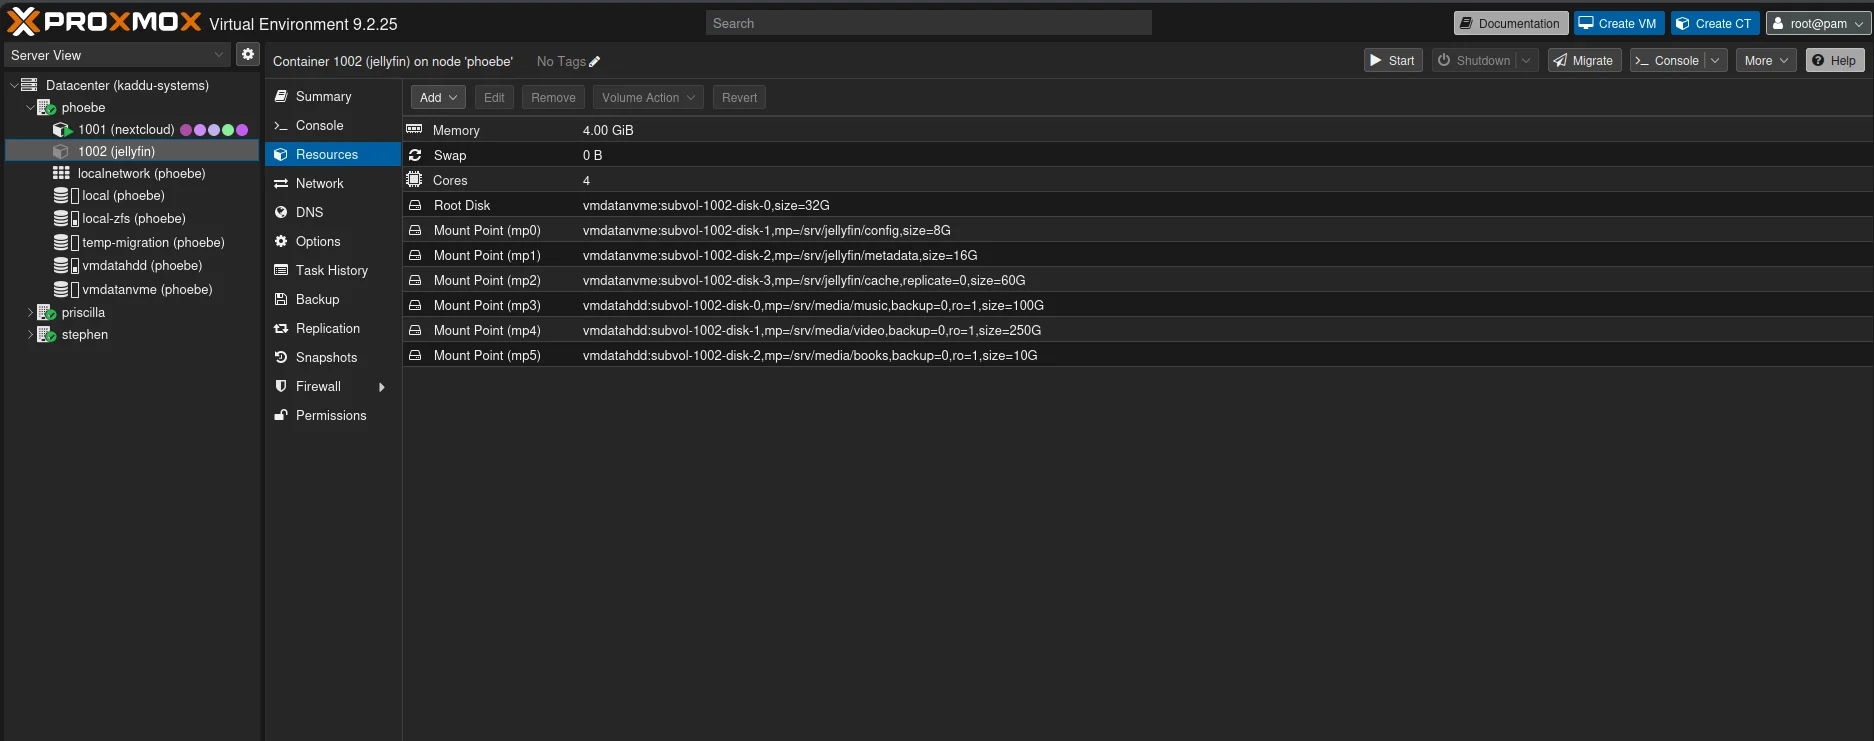
This is mine just after I made them, before I added backup=1 to the
first two. The media volumes say backup=0 because I wrote it out,
which does the same as leaving it out.
ro=1 makes the media read-only inside the container [6].
Jellyfin can then never change or delete a file in the library,
whatever I click on. The files go in from the host instead, further
down.
Each volume is a ZFS dataset of its own. Proxmox names them after the container, and the container’s own disk is number 0:
pct config 1002 | grep ^mp
zfs list -o name,refquota,mountpoint -r rpool/data/vmdatanvme paula/data/vmdatahdd | grep 1002
On mine, mp0 to mp2 became subvol-1002-disk-1 to -disk-3 on the
NVMe, after the container’s own disk, number 0. The media volumes are
numbered on their own storage, so they became subvol-1002-disk-0 to
-disk-2 on the hard disk. Check yours, because the numbers depend on
what was there before. Then set the ZFS properties, still before
anything is written to them:
N=rpool/data/vmdatanvme
H=paula/data/vmdatahdd

# config: the database wants a small record size
zfs set recordsize=8K atime=off dedup=off $N/subvol-1002-disk-1
# metadata: artwork
zfs set atime=off dedup=off $N/subvol-1002-disk-2
# cache: no backup of any kind
zfs set atime=off dedup=off syncoid:sync=false $N/subvol-1002-disk-3
# media: music, video, books
zfs set recordsize=1M atime=off dedup=off $H/subvol-1002-disk-0
zfs set recordsize=1M atime=off dedup=off $H/subvol-1002-disk-1
zfs set recordsize=32K atime=off dedup=off $H/subvol-1002-disk-2

zfs get -o name,property,value recordsize,atime,dedup,refquota,syncoid:sync \
  $N/subvol-1002-disk-1 $N/subvol-1002-disk-2 $N/subvol-1002-disk-3 \
  $H/subvol-1002-disk-0 $H/subvol-1002-disk-1 $H/subvol-1002-disk-2
The hard disk’s tier already has recordsize=1M for everything on it,
so the two recordsize=1M settings only repeat it. I set them anyway, so
the volumes keep their record size if they are ever moved. The books get
32K because that is what the books have on my backup server, where the
copies were made from: with the same record size, the backup copy can
deduplicate against the original there.
Settings made like this stay with the dataset. When replication copies it to another server, they go along.
sanoid still snapshots the cache on phoebe itself, and I have left that
on for now: the snapshots
stay on phoebe and are pruned on sanoid’s normal schedule, so the
price is that deleted transcode files hold on to their space until
the last snapshot with them is gone. If that starts to show, a section
for the cache dataset in /etc/sanoid/sanoid.conf switches its
snapshots off:
[rpool/data/vmdatanvme/subvol-1002-disk-3]
        autosnap = no
        autoprune = yes
That works because the section for the whole tier above it says
recursive = yes, so sanoid handles each dataset under it one at a
time and lets a section for one of them override the rest. The media
volumes on the hard disk need nothing: that tier has its own section in
sanoid.conf, and my backup server already pulls everything under it.
Permissions in an unprivileged container
In an unprivileged container the user IDs are shifted: root inside is user 100000 on the host, and the IDs after it follow in order, so user 1000 inside is user 101000 [7]. A new volume belongs to the container’s root. Jellyfin will run as user 1000, so the three volumes it writes to must belong to 1000. The easiest place to do that is inside the container, where the numbers need no arithmetic:
pct start 1002
pct enter 1002
chown 1000:1000 /srv/jellyfin/config /srv/jellyfin/metadata /srv/jellyfin/cache
ls -ln /srv/jellyfin /srv/media
Before the chown, all six belonged to 0, the container’s root. After
it, the three folders under /srv/jellyfin show owner 1000.
The media only has to be readable. Files I copy in on the host belong to the host’s root, or keep the owner they had on the computer they came from, and inside the container they show up as owned by nobody. That is fine, as long as folders are readable and enterable by everyone and files are readable by everyone, which is what you normally get when you copy files in. If Jellyfin later shows an empty library, this is the first thing to check, on the host, for each media volume:
chmod -R a+rX /paula/data/vmdatahdd/subvol-1002-disk-0Proxmox VE 9.2 also has an idmap option on each mount point, which
overrides the container’s ID mapping for that one mount
[6]. I have not needed it for this.
Installing Docker in the container
Inside the container. First bring the template’s packages up to date. Mine had six updates waiting:
pct enter 1002
apt update
apt full-upgrade -y
Then the commands from Docker’s own instructions for Debian, which
list Debian 13 as supported [8]. I have left out sudo,
since pct enter makes you root.
apt install -y ca-certificates curl
install -m 0755 -d /etc/apt/keyrings
curl -fsSL https://download.docker.com/linux/debian/gpg \
  -o /etc/apt/keyrings/docker.asc
chmod a+r /etc/apt/keyrings/docker.asc

tee /etc/apt/sources.list.d/docker.sources <<EOF
Types: deb
URIs: https://download.docker.com/linux/debian
Suites: $(. /etc/os-release && echo "$VERSION_CODENAME")
Components: stable
Architectures: $(dpkg --print-architecture)
Signed-By: /etc/apt/keyrings/docker.asc
EOF

apt update
apt install -y docker-ce docker-ce-cli containerd.io docker-buildx-plugin docker-compose-plugin

docker run --rm hello-world
If the last command prints its greeting, Docker works inside the LXC.
Mine did on the first try, with Docker 29.9.3 and Compose 5.7.0. With
nesting and keyctl on, there was nothing else to do.
There is one harmless thing you may see on the way: a screenful of
“perl: warning: Setting locale failed” from apt. The container
inherits the language setting en_US.UTF-8 from the shell you came
from, but the Debian template does not have that locale installed. It
does not stop anything. The locales package is already in the
template, so getting rid of it takes two lines in the container:
sed -i 's/^# *en_US.UTF-8 UTF-8/en_US.UTF-8 UTF-8/' /etc/locale.gen
locale-gen
Installing Jellyfin 12
The compose file
Create a folder for it and write the file:
mkdir -p /opt/jellyfin
nano /opt/jellyfin/docker-compose.yamlservices:
jellyfin:
image: jellyfin/jellyfin:12.4
container_name: jellyfin
user: 1000:1000
ports:
- 8096:8096/tcp
- 7359:7359/udp
environment:
- TZ=Europe/Copenhagen
volumes:
- /srv/jellyfin/config:/config
- /srv/jellyfin/metadata:/config/metadata
- /srv/jellyfin/cache:/cache
- /srv/media/music:/media/music:ro
- /srv/media/video:/media/video:ro
- /srv/media/books:/media/books:ro
restart: unless-stoppedIt is the example from Jellyfin’s documentation [1] with my folders in it. Line by line, where there was something to choose:
image: jellyfin/jellyfin:12.4is the official image. The documentation also mentions images from LinuxServer.io and hotio [1]; I stay with the project’s own. The tag is the version [14]. I do not uselatest, and I do not let anything update it for me: upgrading Jellyfin changes the database, so I do it on a day I choose, with a backup first. That is part 5.user: 1000:1000runs Jellyfin as an ordinary user and not as root. This is the user 1000 that owns the three folders.ports: 8096 is the web interface, and 7359 lets the apps find the server on the network by themselves [1]. The alternative is host networking, which you need for DLNA [1]. I do not use DLNA.volumes: the first three are the volumes Jellyfin writes to. The artwork is mounted inside/config, at/config/metadata. The media folders end in:ro, read-only, a second time.restart: unless-stoppedstarts Jellyfin again after a reboot.
The lines for the graphics chip come in part 3, and a proper address with HTTPS in part 4.
Starting it
cd /opt/jellyfin
docker compose up -d
docker compose logs -f
The first start downloads the image. Leave the log with Ctrl+C when it goes quiet, and check:
docker compose ps
ls /srv/jellyfin/config /srv/jellyfin/cache
docker compose ps should say healthy after half a minute; the image
checks itself on port 8096 [9]. Mine pulled the image in 17
seconds, Jellyfin reported “Startup complete” after nine, and it was
healthy when I looked 45 seconds later. The log’s times were in Danish
time, so TZ works.
The volumes filled the way they should:
/srv/jellyfin/config:
config  data  log  metadata  plugins  root

/srv/jellyfin/cache:
CACHEDIR.TAG  fontconfig  transcodes
data is where the database is. The metadata in that list is the
artwork volume mounted there, and it stays empty until the first scan.
If the log is full of “permission denied”, the chown in the
container is the place to look.
Alternative: the Debian repository
Without Docker, Jellyfin installs from its own package repository on
Debian and Ubuntu [10]. It then runs as a service user
called jellyfin, and its files are in /var/lib/jellyfin and
/etc/jellyfin. It is one layer less. I prefer the compose file for
the reasons at the top, but nothing later in the series depends on
Docker except where I say so.
The setup wizard
Open http://<the container's address>:8096 in a browser. The wizard
has five steps and a closing screen [4]:
- Language of the interface.
- The administrator account. Pick a name that is not
admin, and a real password. This account can delete libraries and users. - Media libraries. Skip this step. I add the libraries afterwards, one at a time, so I can watch each scan.
- Metadata language and country. This decides which language the descriptions and titles are fetched in.
- Remote access. Leave Allow remote connections to this server ticked, as the documentation recommends [4]. It does not open anything to the internet: nothing is reachable from outside until you open a port in your router, and I will not. I reach my home network through Tailscale when I’m out, and part 4 sets Jellyfin up for that. Unticking it blocks every connection that doesn’t come from the local network.
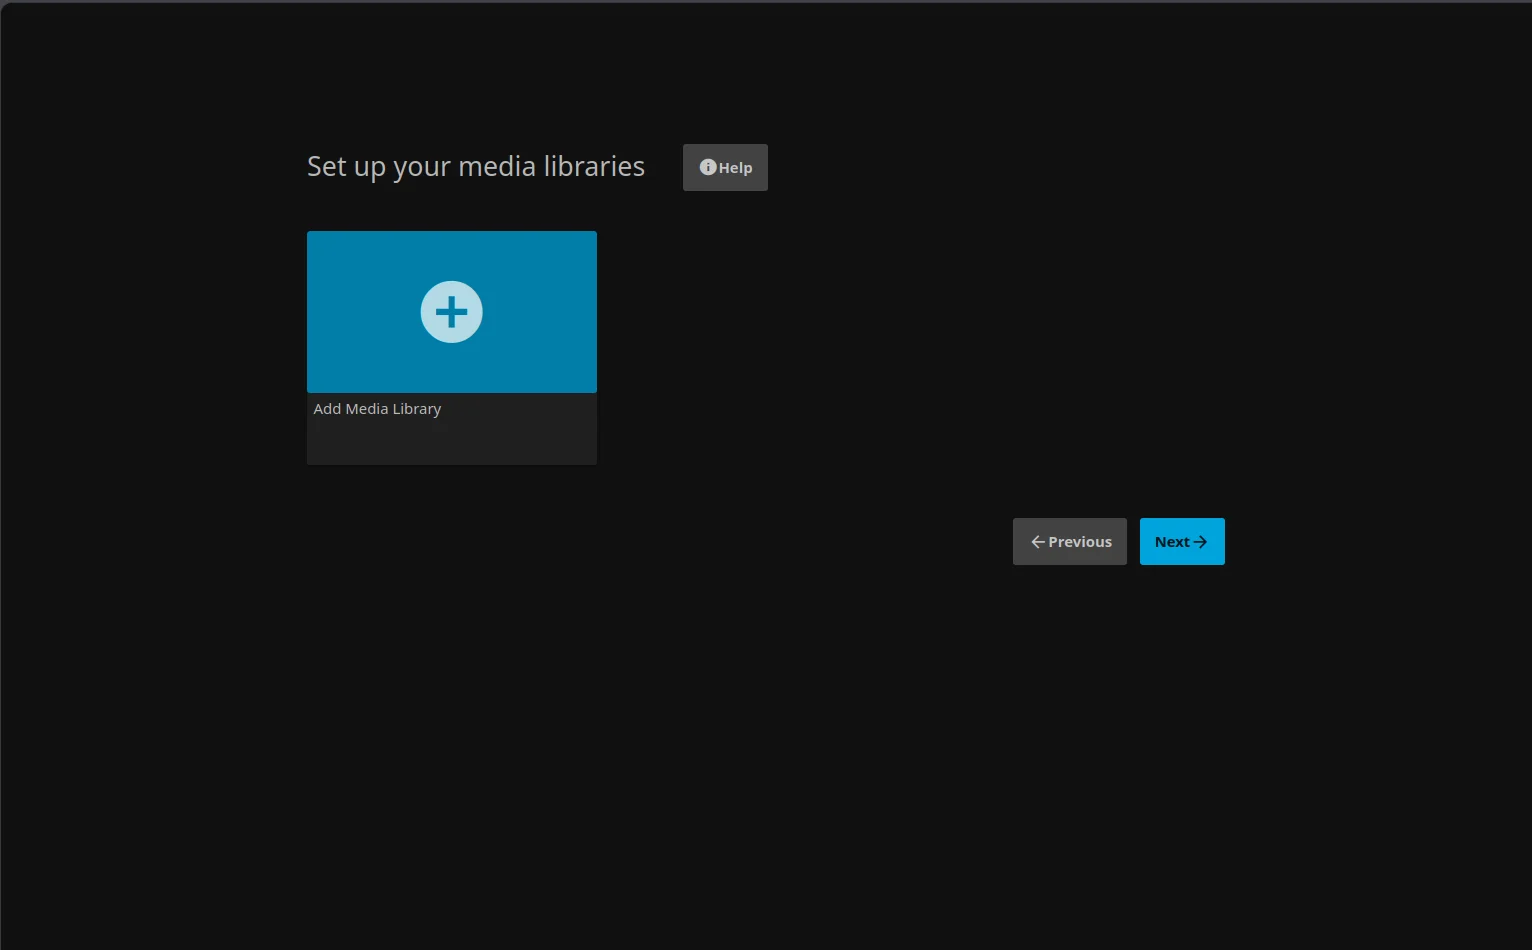
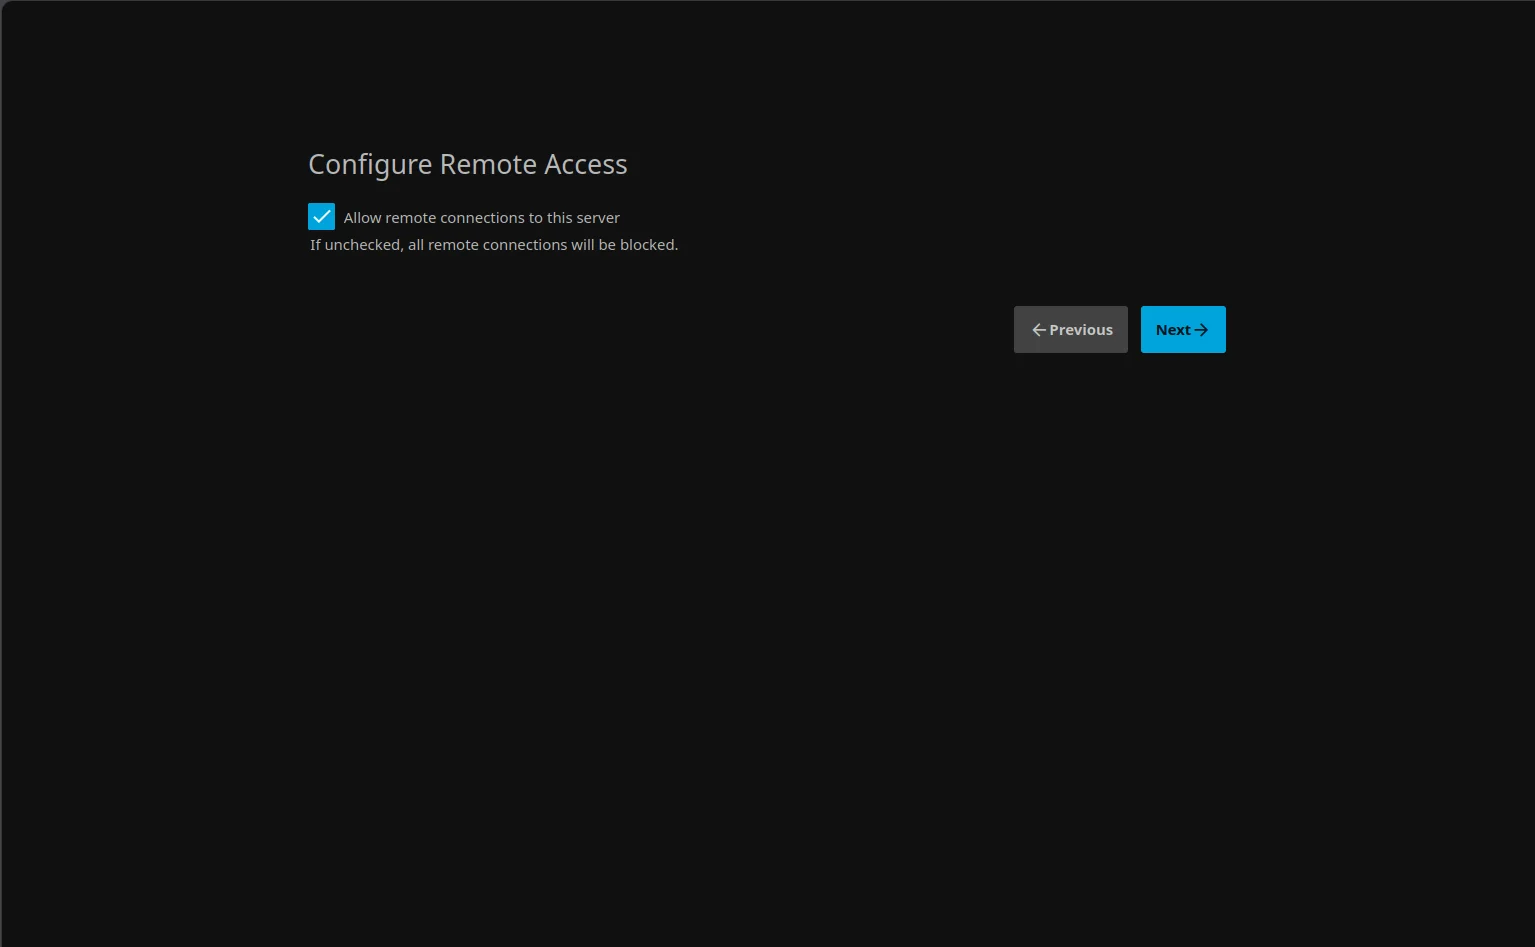
I chose English and Denmark. We speak English at home, and a guide in English is easier to follow for most readers too. The country is where we live.
After the wizard
The wizard ends on an empty home screen, which is right: there are no libraries yet.
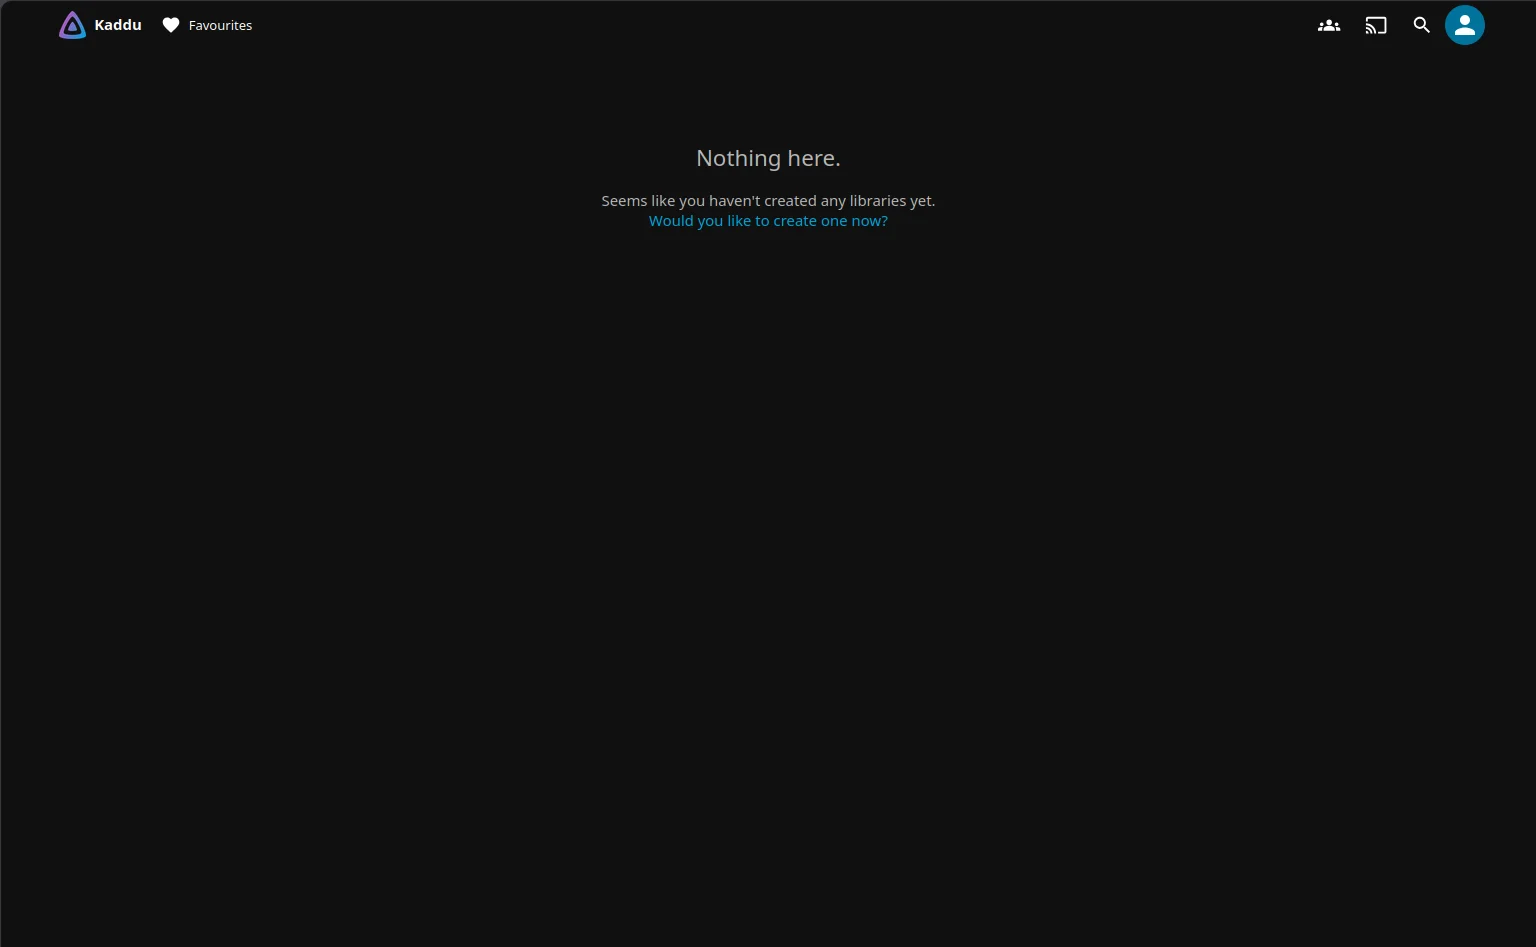
A few things before the first library:
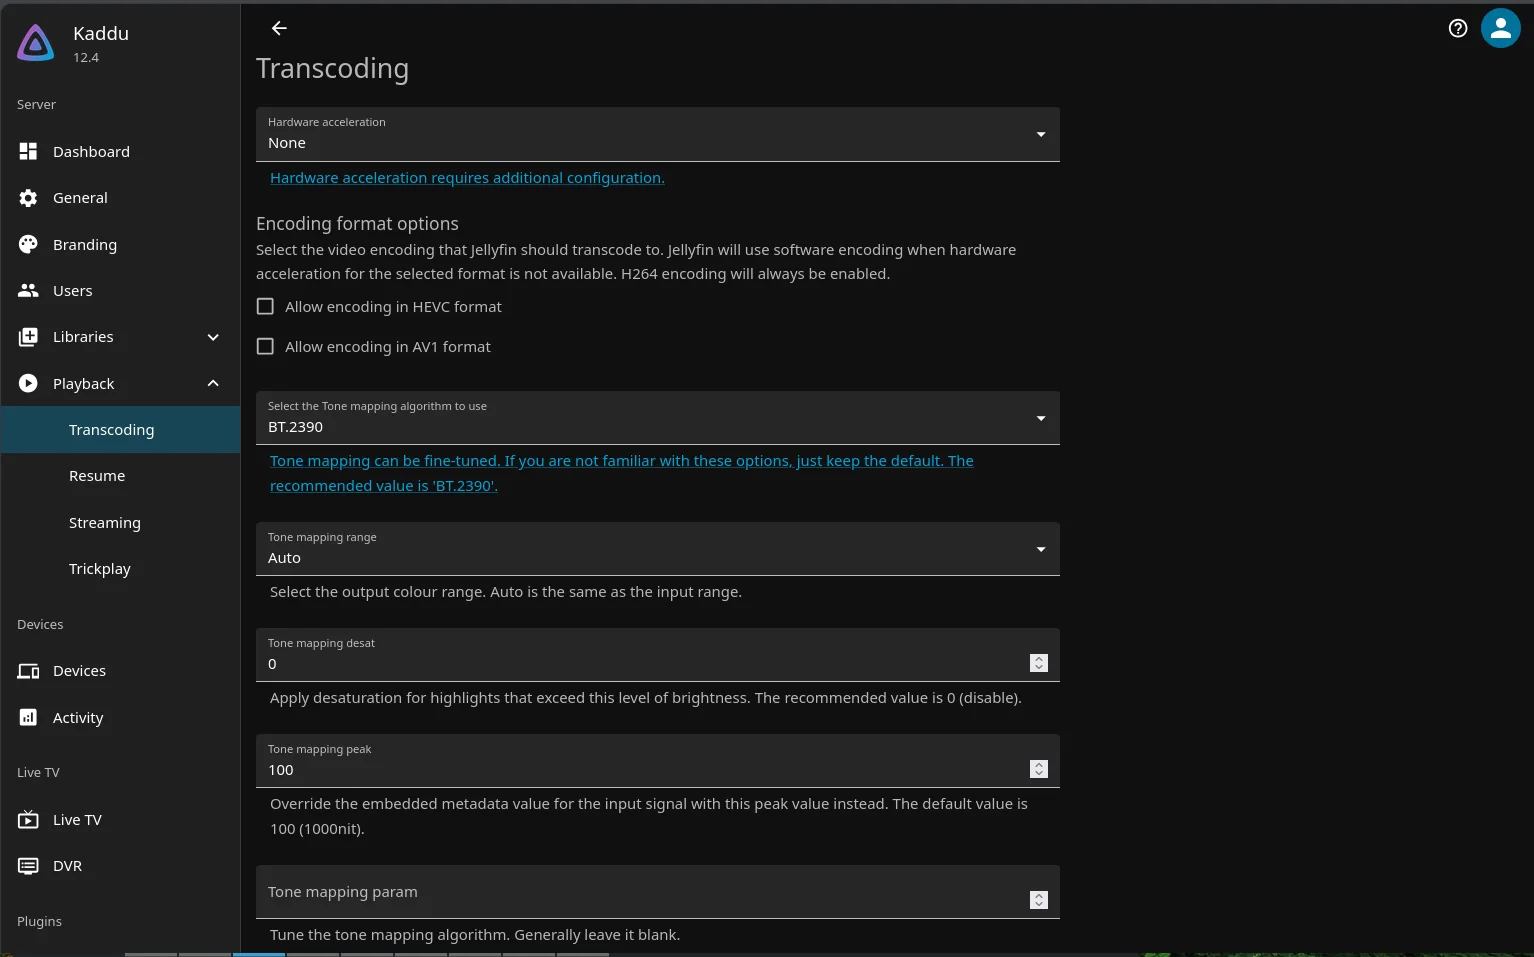
- Dashboard → Playback → Transcoding: leave hardware acceleration
at None until part 3. Further down the same page, check that the
transcode path points into
/cache. With this compose file it is/cache/transcodeswithout any change. - A second user for daily use, without administrator rights. Log in as that one on the TV and the phones.
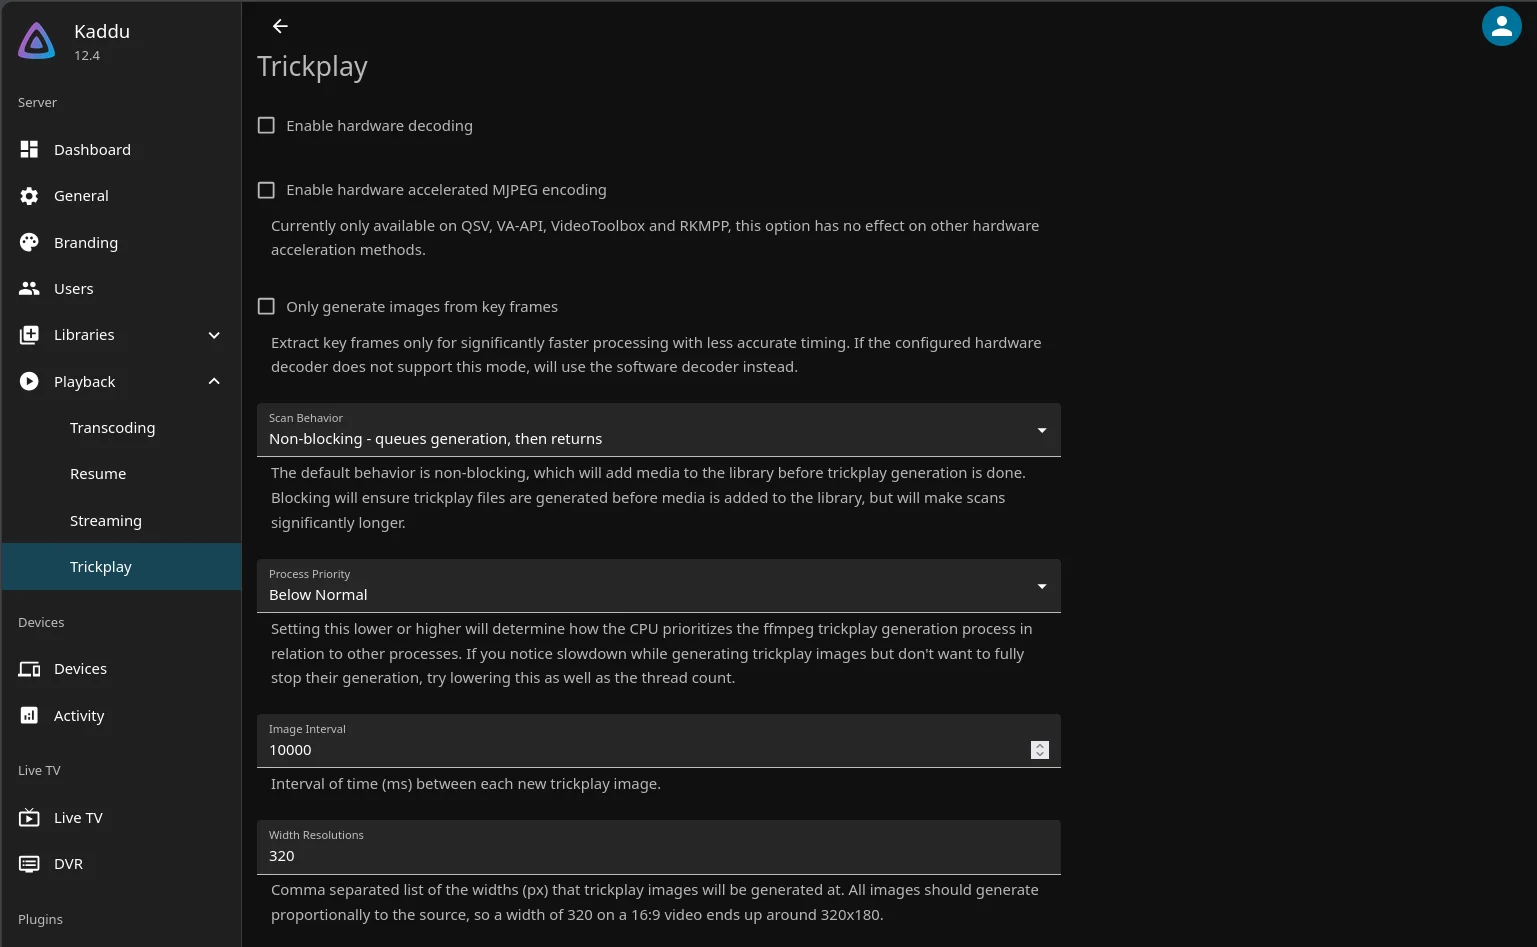
- Trickplay is the small preview pictures you see when you drag the progress bar. Making them means decoding every film once, and without the graphics chip that is hours of processor time. It is switched on per library, in the dialog for a film or video library, and in 12.4 it is off by default, as are the chapter images. I switched both on anyway, but only while the library is a small test set of a few films, to see what the processor alone makes of it. Before the rest of the films go in, I switch them off again, and they stay off until the graphics chip takes over in part 3. Part 3 has the numbers.
The settings for how the pictures are made are under Dashboard → Playback → Trickplay. Out of the box they don’t use the graphics chip, they run at below-normal priority, and they take one picture every ten seconds, 320 pixels wide. They are made by a scheduled task at night, and a scan doesn’t wait for them.
The first library: music
I load my library in batches: the music first, then the films, then the shows in two or three rounds. Each batch gets scanned and backed up before the next one goes in. If something is wrong with the setup, I find out with 45 GB and not with all of it, and my backup server gets one batch at a time over a slow link.
The media volumes are read-only inside the container, so the files go in from the host, straight into the music volume’s dataset. From the computer that has them:
rsync -ah --info=progress2 ~/jellyfin_tmp_media/music/ \
  root@phoebe:/paula/data/vmdatahdd/subvol-1002-disk-0/
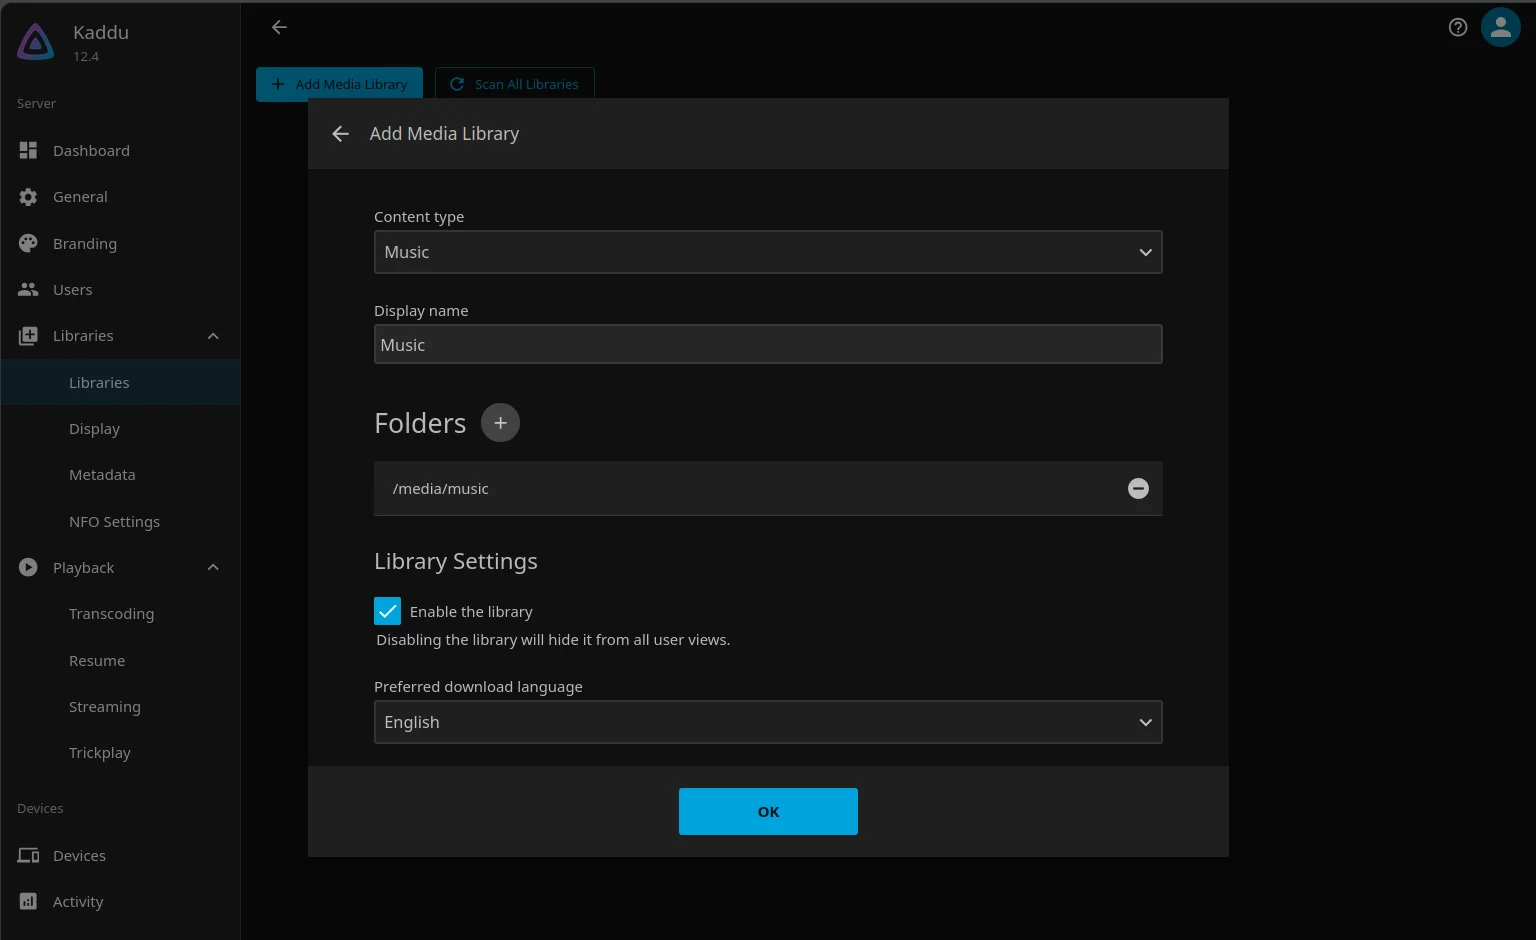
Then in Jellyfin: Dashboard → Libraries → Add Media Library, content
type Music, folder /media/music. The scan starts by itself.
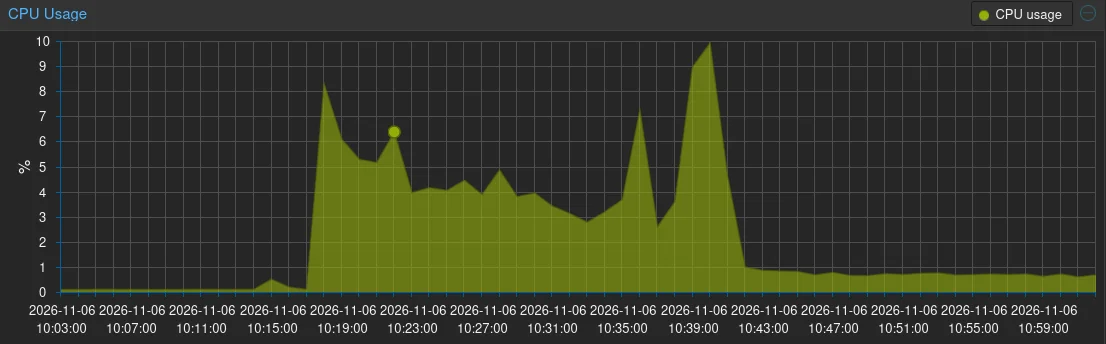
The scan hardly touches the processor. On mine it took 54 minutes. For the first 25 minutes the container used under 10 % of its four cores, most of the time around 4 %. The rest was waiting for MusicBrainz, the online music database, which answered “busy” to many of the artist lookups:
The library can be used while the scan is still running. Albums turn up first, and the covers and artist pictures come in as Jellyfin finds them:
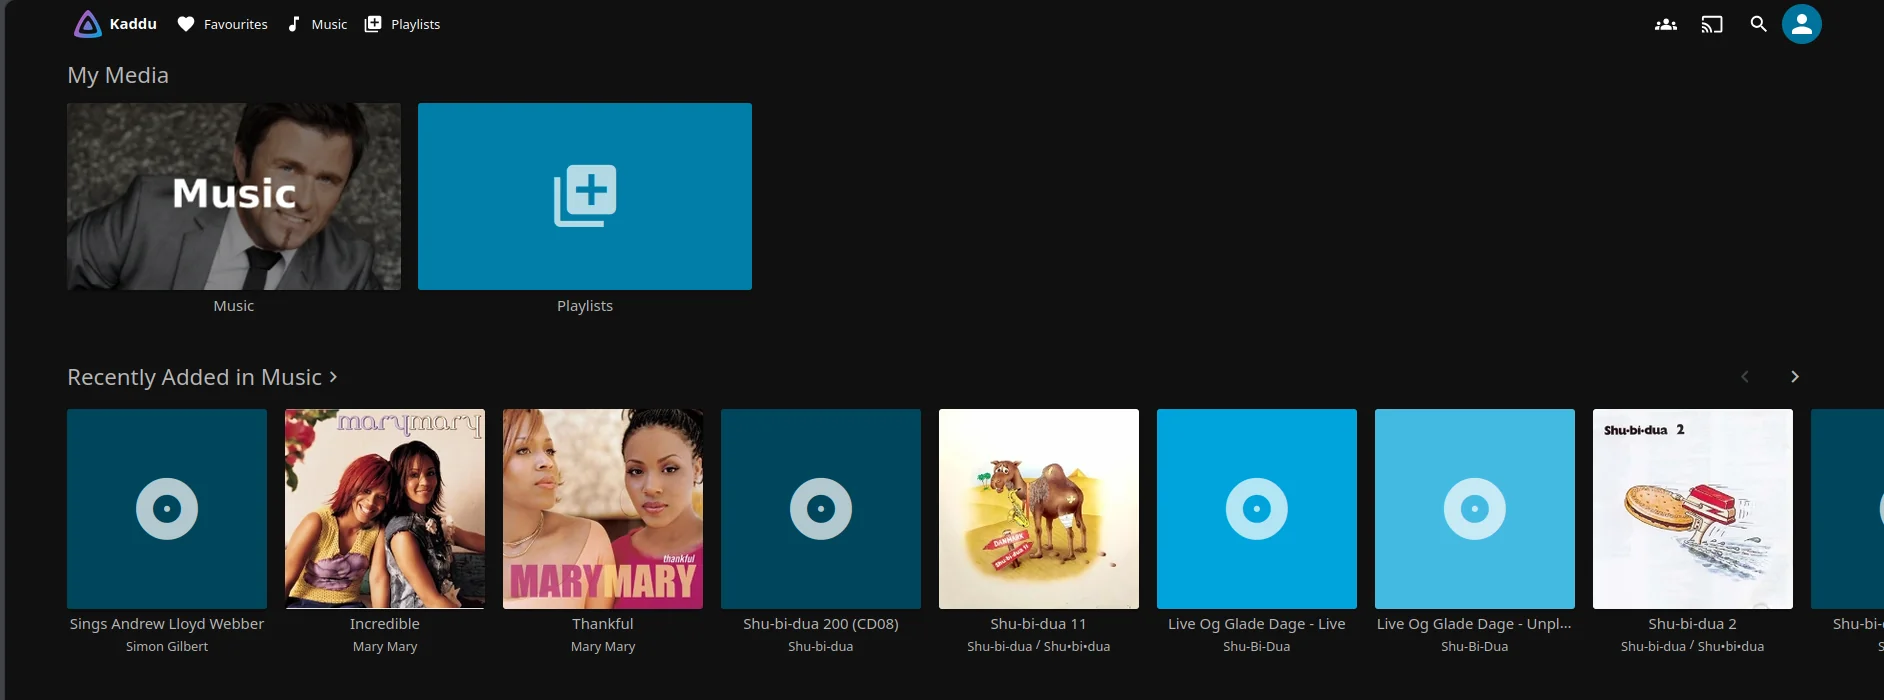
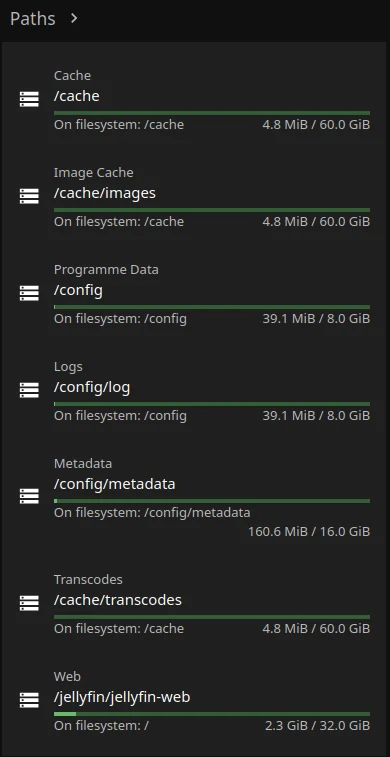
When the scan is done, the dashboard’s Paths panel is the quickest way to see that the volumes work as planned. Each folder Jellyfin uses is listed with the filesystem it is on. The artwork is on its own 16 GiB volume, the database and the logs on the 8 GiB config volume, and the transcodes go to the cache:
The films go in /media/video/movies and the shows in
/media/video/shows, each as its own library. The two folders are made
on the host, in the video volume, before the first copy:
mkdir /paula/data/vmdatahdd/subvol-1002-disk-1/movies \
      /paula/data/vmdatahdd/subvol-1002-disk-1/shows
How to name the folders so Jellyfin recognises them is part 2, and it is worth reading before you copy them in.
Home videos
One part of the library is different from the rest: our own home videos, about 25 GB of them. A film can be bought or ripped again. These can’t be made again, and they are private.
Today they exist in one place only, on the big pool in my backup server. The copy that goes into Jellyfin is therefore more than a convenience: it is the second copy, on another machine and another disk. Two copies is the minimum for anything that can’t be replaced, as I wrote in 3-2-1 in practice.
They go in a folder of their own in the video volume, and get a library of their own:
mkdir /paula/data/vmdatahdd/subvol-1002-disk-1/home-videos
rsync -ah --chmod=a+rX --info=progress2 /path/to/home-movies/ \
  root@phoebe:/paula/data/vmdatahdd/subvol-1002-disk-1/home-videos/
Mine came straight from the backup server, which is on a PowerLine link: 24.58 GB in a little over two hours.
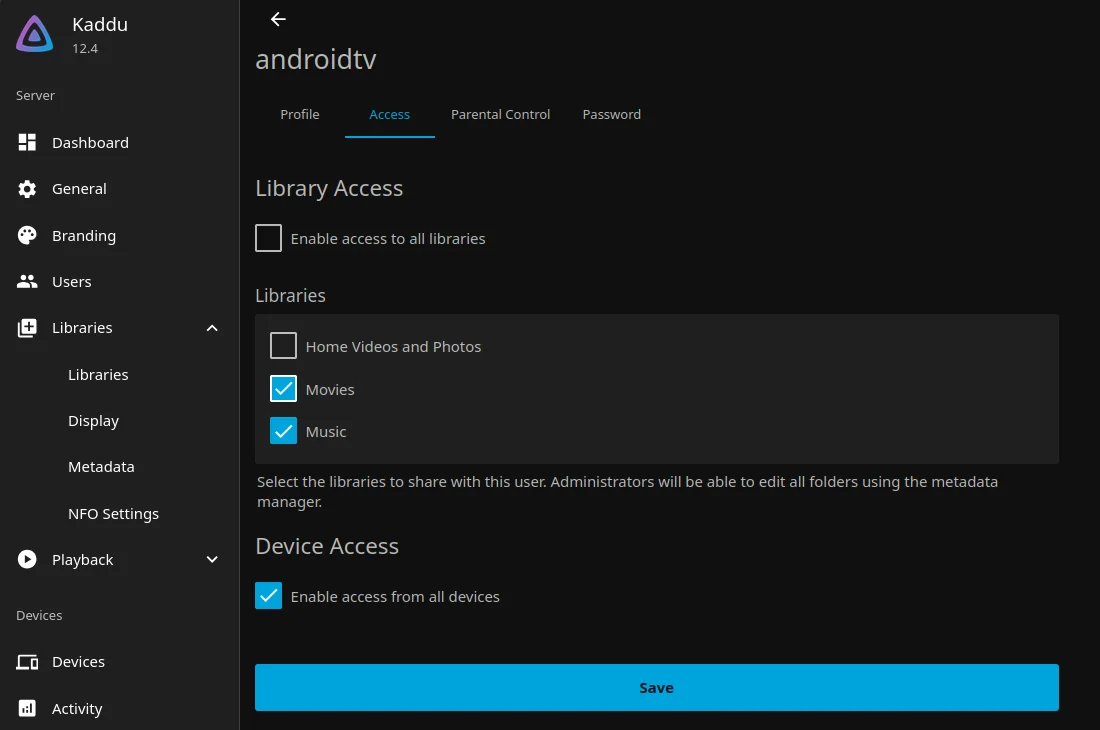
In Jellyfin the content type is Home Videos and Photos, folder
/media/video/home-videos. Then it is a matter of who may see it: under
Dashboard → Users, each user has an Access tab, and there I untick
Enable access to all libraries for anyone who shouldn’t see them, and
leave the home videos unticked. To show how it looks, I did it for the
user on our TV:
The --chmod=a+rX in the copy command above is there because of what
happened to mine. On the
backup server the home videos could only be read by their owner, and
rsync -a keeps permissions as they are. Inside the container the
files belong to nobody, so Jellyfin couldn’t read them, and the new
library stayed empty. The chmod from the permissions section fixed
it, followed by a new scan of the library.
The scan then filled the log with errors of another kind:
Read-only file system. Jellyfin tried to save a poster and the
trickplay pictures next to each video, in the media folder. It can’t,
because the media volume is read-only, and it falls back to the
metadata volume by itself, which is where I want them anyway. To keep
the log quiet, untick the options to save artwork and trickplay
pictures in the media folders, in each library’s settings.
Dos and don’ts
- Do create the volumes and set their record sizes before the first start. A record size set afterwards only applies to new data [2].
- Do keep the database on a local SSD. Not on a network share [2].
- Do pin the version in the compose file.
- Do load a big library in batches.
- Don’t let the cache be backed up, replicated or sent to the backup server. That is three switches, not one.
- Don’t give Jellyfin write access to the media unless you have a reason.
- Don’t expect the Proxmox backup of the container to contain the media: I left it out on purpose, because the ZFS pull already has it.
What’s next
Jellyfin is running and the music is in. Not all of it looks right yet: after the first scan most of my albums had no cover, and one band turned up as three different artists. Part 2 is about folders, file names and metadata, so that the music gets tidied up and the films and shows are recognised the first time.
Sources
- Jellyfin: container installation, pulled 2026-10-29
- Jellyfin: storage, pulled 2026-10-29
- Jellyfin: hardware selection, pulled 2026-10-25
- Jellyfin: setup wizard, pulled 2026-10-29
- Linux Container (Proxmox VE wiki), pulled 2026-10-29
- pct.conf (Proxmox VE 9.2 documentation), pulled 2026-10-29
- Unprivileged LXC containers (Proxmox VE wiki), pulled 2026-10-29
- Install Docker Engine on Debian (Docker documentation), pulled 2026-10-29
- Jellyfin’s Dockerfile (jellyfin-packaging on GitHub), pulled 2026-10-29
- Jellyfin: Linux installation, pulled 2026-09-25
- Jellyfin (Proxmox VE Helper-Scripts), pulled 2026-09-25
- [Guide] Jellyfin + remote network shares + HW transcoding with Intel’s QSV + unprivileged LXC (Proxmox forum), further reading, pulled 2026-09-25
- Jellyfin Server 12.4 release notes (GitHub), with the dates of 12.0 to 12.4 from the GitHub releases list, pulled 2026-10-29
- jellyfin/jellyfin tags (Docker Hub), pulled 2026-10-29
- Proxmox Container Toolkit: mount points, migration and moving volumes (Proxmox VE 9.2 documentation), pulled 2026-10-29
- Backup and Restore (Proxmox VE 9.2 documentation), pulled 2026-10-09
- Storage Replication (Proxmox VE 9.2 documentation), pulled 2026-10-29
- sanoid and syncoid (GitHub, jimsalterjrs), pulled 2026-10-29